Tesla Model S: Link - Sway Bar - Front - LH (Remove and Replace)
Tesla Model S (2012-2026) Service Manual / Suspension / Link - Sway Bar - Front - LH (Remove and Replace)
Warning: If the vehicle has air suspension, activate "Jack" mode on the touchscreen before raising and supporting the vehicle. Removal
- Loosen the front LH lug nuts (torque 175 Nm).
- Raise and support the vehicle (refer to procedure)
- Remove road wheel (refer to procedure)
- Remove and discard the nut securing link to knuckle (torque 70 Nm). Caution: To prevent ball joint damage, always hold the ball joint pin with a wrench while loosening or tightening the lock nut.
- Remove and discard nut securing link to sway bar (torque 70 Nm).
Caution: To prevent ball joint damage, always hold the ball joint pin with a wrench while loosening or tightening the lock nut.
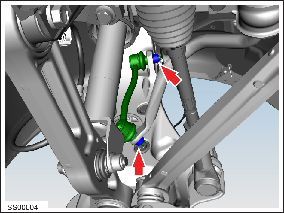
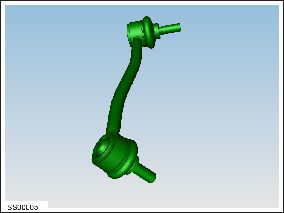
- Remove sway bar link.
Installation procedure is the reverse of removal.
Caution: Replace all nylon-insert locknuts.
READ NEXT:
 Sway Bar - Front (RWD) (Remove and Replace)
Warning: If the vehicle has air suspension, activate "Jack"
mode on the touchscreen before raising and supporting the vehicle.
Removal
Remove the underhood storage unit (refer to
Sway Bar - Front (Dual Motor) (Remove and Replace)
Warning: If the vehicle has air suspension, activate "Jack"
mode on the touchscreen before raising and supporting the vehicle.
Warning: If the 12V power supply is disconnected, do
not att
Control Arm - Upper - Front - LH (Remove and Replace)
Warning: If the vehicle has air suspension, activate "Jack"
mode on the touchscreen before raising and supporting the vehicle.
Removal
Position the vehicle in preparation for raising
SEE MORE:
Shaft - Steering Column - Intermediate Upper (Remove and Replace)
Removal
Remove the driver's side footwell cover (refer to procedure).
Disconnect the lower intermediate shaft (refer to procedure).
Disconnect the lower intermediate shaft from the slot in the
upper intermediate shaft.
Release the upper intermediate shaft from the co
Actuator - Cinching (Remove and Replace)
Removal
Open liftgate and secure at working height.
Remove liftgate trim (refer to procedure)
Remove screws x3 securing cinch motor to liftgate.
Release harness clip, rotate the cinch clockwise to access
harness connector.
Disconnect harness connector.
© 2019-2026 Copyright www.tesms.org
