Tesla Model S: Actuator - Front Passenger's Temperature (Remove and Replace)
Tesla Model S (2012-2026) Service Manual / Thermal Management / Actuator - Front Passenger's Temperature (Remove and Replace)
Removal
- Remove glove box assembly (refer to procedure)
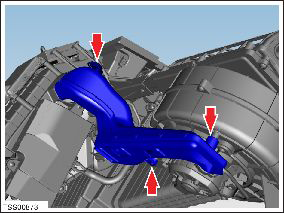
- Disconnect duct temperature sensor harness connector.
- Remove screw securing duct to HVAC assembly, release from spigot
and position duct aside (torque 1 Nm).
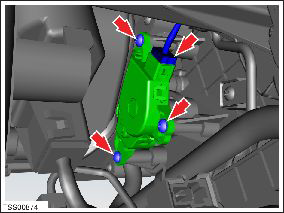
- Disconnect actuator harness connector.
- Remove screws (x3) securing actuator to HVAC assembly (torque 1 Nm).
- Remove temperature control door actuator.
Caution: Take care not to damage component(s).
Installation procedure is the reverse of removal.
READ NEXT:
 Actuator - Defrost (Remove and Replace)
Removal
Remove glove box assembly (refer to procedure)
Disconnect actuator harness connector.
Remove screws (x3) securing defrost door actuator to HVAC
assembly (torque 1 Nm).
Motor - Fan assembly - HVAC (Remove and Replace)
Removal
Power the passenger seat fully rearward for access.
Remove the passenger footwell closing trim (refer to procedure).
Disconnect the fan harness connector and position the
Hose - HVAC - Drain (Remove and Replace)
Removal
Remove the LH closeout extension assembly (refer to procedure).
Note: For vehicles built with the cold weather
package between May 31, 2013 and July 11
SEE MORE:
Steering Rack (RWD) (Remove and Replace) - Removal
Warning: If the vehicle has air suspension,
activate "Jack" mode on the touchscreen before raising and
supporting the vehicle.
Removal
Ensure that the front road wheels are in a straight ahead
position.
Lock the steering wheel in position.
Remove the underhood s
Air pressure below recommendation for tires
Check pressure and refill air as needed
This alert does NOT indicate that there is a flat tire.
The tire pressure monitoring system (TPMS) has detected that the air pressure in
one or more of your tires is at least
20% lower than the recommended cold tire pressure.
See Maintaining Tire Pressures
© 2019-2026 Copyright www.tesms.org
