Tesla Model S: Air Line - Air Suspension - Reservoir to Compressor (Remove and Replace)
Tesla Model S (2012-2026) Service Manual / Suspension / Air Line - Air Suspension - Reservoir to Compressor (Remove and Replace)
Removal
- Raise and support the vehicle (refer to procedure).
- Depressure the air suspension system (refer to procedure).
- Disconnect 12V power.
- Rear wheel drive (RWD): Refer to procedure.
- Dual Motor: Refer to procedure.
- Remove the underhood storage unit (refer to procedure).
- Release the fitting from the compressor (torque 3.5 Nm).
Caution: Plug the line connection to prevent ingress of moisture or dirt.
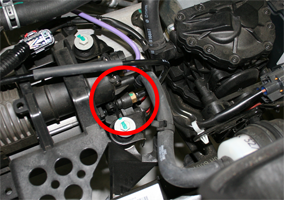
- Release the air line clips (x3) between the compressor and the reservoir.
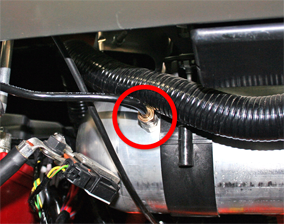
- Use 2 wrenches to release the fitting from the reservoir: 1 to
hold the fitting (12 mm) and 1 to hold the mounting (13 mm) (torque
5 Nm).
Caution: Plug the line connection to prevent ingress of moisture or dirt.
Installation procedure is the reverse of removal, except for the following:
- Install new fittings into the compressor and reservoir
before installing the air line.
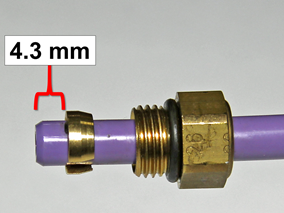
Note: Ensure that the collet is 4.3 mm from the end of the air line to prevent air pressure restriction.
READ NEXT:
 Air Line - Air Suspension - Compressor to Valve Block (Remove and Replace)
Warning: To avoid personal injury, eye protection must be
worn when performing this operation.Removal
Raise and support the vehicle (refer to procedure).
Disconnect 12V power.
Air Line - Air Suspension - Valve Block Exhaust (Remove and Replace)
Removal
Raise and support the vehicle (refer to procedure).
Remove the underhood storage unit (refer to procedure).
Release the fitting from the valve block (torque 3.5 Nm).
Spring and Damper Assembly - Front - LH (Remove and Replace)
Removal
Remove the front road wheel (refer to procedure).
Lower the vehicle.
Remove the underhood apron (refer to procedure).
Remove the nuts (x3) that secure the coil spring modu
SEE MORE:
Boombox
NOTE: Boombox is available only on vehicles equipped with the Pedestrian
Warning System (PWS).
Boombox, an app in Toybox, uses the Pedestrian Warning System (PWS) speaker
to play media externally when
Model S is parked. You can customize sounds by plugging in a specifically-formatted
USB drive,
Mount - Front Drive Unit - RH (Remove and Replace) - Installation
Installation
Use alcohol wipes to clean the mating surfaces between the RH
drive unit mount and drive unit.
Place a shear plate on the outboard side of the drive unit mount
so that the shear plate bolt holes align with the motor mount bolt
holes.
Cau
© 2019-2026 Copyright www.tesms.org
