Tesla Model S: Antenna - GPS (Remove and Replace)
Tesla Model S (2012-2026) Service Manual / Infotainment / Antenna - GPS (Remove and Replace)
Removal
- Remove liftgate glazing (refer to procedure)
- Disconnect GPS harness connector.
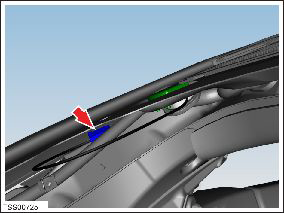
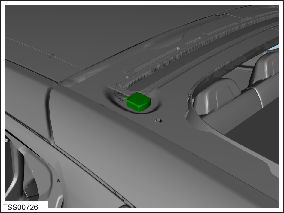
- Release GPS antenna from adhesive bond.
- Release wiring harness from liftgate. Note: Note installed position of components before removal.
- Remove GPS antenna.
Installation procedure is the reverse of removal.
Note: Clean the affected areas before installation.
Warning: Only use cleaning agents and solvents in a well-ventilated area.
Antenna - WiFi (Remove and Replace)
Note: The WiFi antenna is a component within the door mirror assembly. If the WiFi antenna develops a fault, the whole mirror assembly must be replaced.Removal
Remove the door mirror assembly (refer to procedure).
Installation
Installation procedure is the reverse of removal.
READ NEXT:
 Antenna - GSM - LH (Remove and Replace)
Note: The GSM antenna is a component within the door
mirror assembly. If the GSM antenna develops a fault, the whole
mirror assembly must be replaced.
Removal
Remove the door
Calibration - Panoramic Roof Assembly
Check
Close panoramic roof glass using touch screen.
Connect a laptop with Toolbox to the vehicle.
In Toolbox, select Views > Body/Security >
Panoramic Sunr
SEE MORE:
Charging stopped - Power lost while charging
Check power source and charging equipment
Power has been lost during charging. This could result from the charging
equipment losing power from the source
(for example, a wall outlet) or from an issue with the charging equipment.
This alert is often accompanied by other alerts that can help you id
Seat Assembly - 3rd Row (Remove)
Removal
Open the liftgate.
Fold down the third row seats.
Caution: Take care not to damage component(s).
Caution: Protect the interior trim from possible damage.
Remove the bolts that secure the third row seatbelt straps
(torque 26
© 2019-2026 Copyright www.tesms.org
