Tesla Model S: Release Cable
Note: This procedure describes how to manually release a cable from the single phase charge port. If the vehicle is equipped with a 3 phase charge port, refer to procedure 44013205 (refer to procedure).
Warning: Only technicians who have been trained in High Voltage Awareness are permitted to perform this procedure. Proper personal protective equipment (PPE) and insulating HV gloves with a minimum rating of class 00 (500V) must be worn any time a high voltage cable is handled. Refer to Tech Note TN-15-92-003, "High Voltage Awareness Care Points" for additional safety information.
Special tool required for this procedure:
| Supplier | Part Number | Description |
| Tesla | 1020288-00-A | TOOL,INSTALLATION,EV INLET,MDLS |
- Perform the vehicle electrical isolation procedure (refer to procedure).
- Remove the LH trunk trim.(refer to procedure)
- Remove the screw and release the clips (x2) from the HV inlet cover (torque 4 Nm).
- Remove the HV inlet cover.
Note: When the HV inlet cover is in the proper position, a post on the cover presses a switch in the charge port that activates the HVIL. The vehicle indicates a HVIL fault if the cover is not properly installed or the post is damaged.
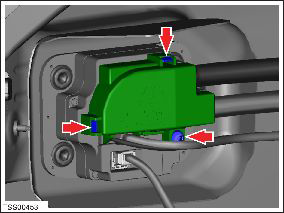
- Remove and discard the 2 bolts (torque 9 Nm) that secure the HV
cables to the charge port. Discard any washers that are installed
between the bolts and the high voltage lugs.
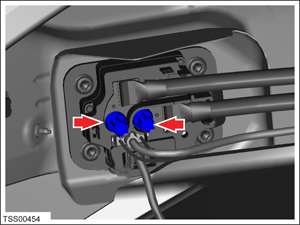
- Pull the tab outward to remove the pawl actuator cover from the
back of the charge port.
- Push the pawl actuator tab to the left to release the pawl and
hold it in place while an assistant removes the charge cable from
the charge port. Once the charge cable is removed, release the pawl.
READ NEXT:
 Reinstall Components
Installation of components is reverse of removal, except for the
following:
When reconnecting the HV cables to the charge port:
Remove any adhesive patch residue from the mating surface
Charge Port - 3 Phase - Manual Release of Cable
Note: This procedure describes how to manually release a
cable from the 3 phase charge port. If the vehicle is equipped with
a single phase charge port, refer to procedure 44013005 (refer to
Door - Charge Port - Non-Motorized (Remove and Replace)
Removal
Remove the LH tail light assembly (refer to procedure).
Remove the screws (x3) that secure the charge port door to the
tail light assembly.
SEE MORE:
Pipe - High Pressure - Charge Port (Remove and Replace)
Removal
Recover refrigerant from the vehicle (refer to procedure)
Remove underhood storage unit (refer to procedure)
Remove nut securing pipe retaining plate to evaporator TXV
(torque 22 Nm).
Remove bolt securing A/C pipe bracket to cross-brace (torque 6
Nm).
Antenna - Satellite Radio - Roof-Mounted (Remove and Replace)
Note: This procedure is for vehicles with panoramic roofs
built after December 23, 2014. On older vehicles, the satellite
radio antenna is located under the liftgate glass (refer to
procedure).
Removal
Remove the panoramic roof fixed glass (refer to procedure).
Remove
