Tesla Model S: Grill - Fascia - Front (Remove and Replace)
Tesla Model S (2012-2026) Service Manual / Body / Grill - Fascia - Front (Remove and Replace)
Removal
- Vehicles with 1st generation front fascia applique only: Remove the front fascia applique refer to procedure.
- Vehicles with 2nd generation front fascia applique only: Remove the front fascia refer to procedure.
- Position front fascia assembly at a suitable working height.
- Remove retainers (x3) securing grill to front fascia.
- Release clips (x22) securing grill to front fascia and fascia
applique.
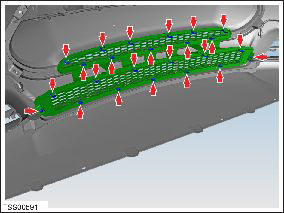
- Remove grill.
Installation procedure reverse of removal.
READ NEXT:
 Chin Spoiler Assembly (Remove and Replace)
Warning: If the vehicle has air suspension, activate "Jack"
mode on the touchscreen before raising and supporting the vehicle.
Removal
Remove the front fascia refer to procedure.
Fascia Assembly - Rear (Remove and Install)
Warning: If the vehicle has air suspension, activate "Jack"
mode on the touchscreen before raising and supporting the vehicle.
Removal
Position the vehicle in preparation for rai
Fascia Assembly - Rear (Remove and Replace)
Removal
Remove the rear fascia for access (refer to procedure).
Remove the bolts (x4) and plastic rivets (x2) that secure the
diffuser tray to the rear fascia (torque 3 Nm).
Relea
SEE MORE:
Integral Link - Rear - LH (Remove and Replace)
Warning: If the vehicle has air suspension, activate "Jack"
mode on the touchscreen before raising and supporting the vehicle.
Removal
Remove road wheel (refer to procedure)
Remove nut and bolt securing link to suspension knuckle (torque
130 Nm).
Remove nut and bolt
Ride Height - Adjust
Special tool required for this procedure:
Supplier
Part Number
Description
Tesla
1049633-00-A
Ride Height Measuring Tool
Setup
Use Toolbox to verify that the "Whe
© 2019-2026 Copyright www.tesms.org
