Tesla Model S: Assembly - Cover - Footwell - LH (Remove and Replace)
Tesla Model S (2012-2026) Service Manual / Instrument Panels and Pedals / Assembly - Cover - Footwell - LH (Remove and Replace)
Removal
- Fully open the driver's door.
- Move the driver's seat rearward for access.
- Remove the LH center console closeout extension (refer to procedure)
- Remove the screws (x2) that secure the footwell closing trim to
the dash (torque 2 Nm).
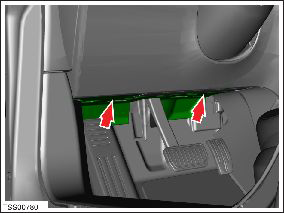
- Carefully release the footwell closing trim from the dash and disconnect it from the rear lugs (x2). Caution: Take care not to damage component(s).
- Disconnect the footwell lamp harness connection.
- Remove the footwell cover trim.
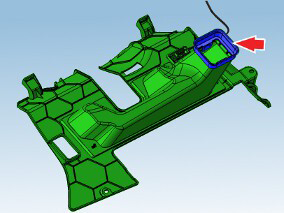
- If the footwell cover trim is replaced, transfer the air duct
adapter to the new footwell cover trim.
Installation procedure is the reverse of removal.
READ NEXT:
 Assembly - Cover - Footwell - RH (Remove and Replace)
Removal
Fully open the passenger door.
Move the passenger seat rearward for access.
Remove the screws (x2) that secure the footwell cover to the
dash (torque 2 Nm).
Assembly - Cover - Footwell - LH (RHD) (Remove and Replace)
Removal
Fully open the passenger door.
Move the passenger seat rearward for access.
Remove the LH center console closeout extension (refer to
procedure).
Release the clips (x4
Assembly - Cover - Footwell - RH (RHD) (Remove and Replace)
Removal
Fully open the driver's door.
Move the driver's seat rearward for access.
Remove the RH center console closeout extension (refer to
procedure).
Release the clips (x2)
SEE MORE:
Seal - Door Front Inner Belt - LH (Remove and Replace)
Removal
Lower door glass.
Remove door trim panel (refer to procedure)
Remove trim stud securing flap seal to door.
Carefully ease flap seal clear of inner belt seal for access.
Caution: Take care not to damage component(s).
Casing - Transmitter - Remote Keyless Entry (RKE)
Caution: Perform this procedure while using the proper anti-electrostatic
discharge equipment. Refer to TN-14-92-003, "Electrostatic Discharge
Tooling".
Removal
Remove the transmitter battery.
Hold the transmitter in one hand. Place the blade of a flat
screwdriver or si
© 2019-2026 Copyright www.tesms.org
