Tesla Model S: Trim - Rear Trunk - Side - LH (Remove and Replace)
Tesla Model S (2012-2026) Service Manual / Interior trim / Trim - Rear Trunk - Side - LH (Remove and Replace)
Removal
- Remove the 'C' post rear trim (refer to procedure).
- Remove the trunk sill panel.
- Remove the trunk side garnish trim.
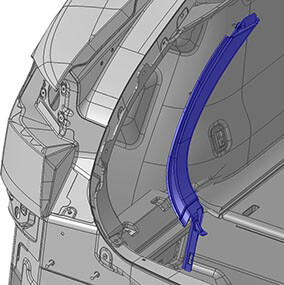
- Remove the trunk floor trim (refer to procedure).
- Peel back the rear edge of the trunk side trim panel and
disconnect the wiring harness.
Caution: Do not damage the wiring harness connection.
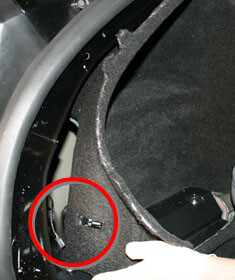
- Remove the LH trunk side trim.
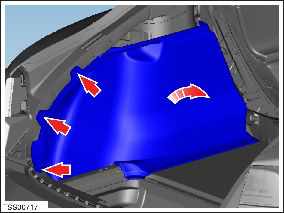
Installation procedure is the reverse of removal.
READ NEXT:
 Trim - Rear Trunk - Side - RH (Remove and Replace)
Removal
Remove the 'C' post rear trim. (refer to procedure)
Remove the trunk side garnish trim.
Remove the trunk floor
Trim - Rear Trunk - Floor (Remove and Replace)
Removal
Open the rear liftgate for access.
Release the tethers (x2) and clips (x2) that secure the trunk
cover to the body.
Remove the trunk cover.
Release the handle and remo
Carpet - Underhood Storage (Remove and Install)
Removal
Open the hood.
Remove the lower carpet from the underhood storage area.
Remove the upper trim panel by pulling
SEE MORE:
Autopark canceled
Take control
Autopark has been canceled. You need to park or finish parking your vehicle
manually.
Once the parking maneuver is complete, apply the brakes and shift into Park.
Your vehicle will otherwise remain free-
rolling.
Autopark can be canceled due to many factors, including the following:
Installing Child Safety Seats
There are two general methods used to install child
safety seats:
Seat belt retained - these seats are secured using the
vehicle's seat belts. All passenger seating positions in
Model S support the use of seat belt retained child
safety seats.
LATCH retained - these seats attach to anchor
© 2019-2026 Copyright www.tesms.org
