Tesla Model S: Trim - Dash - Driver's Side - Lower (Remove and Replace)
Tesla Model S (2012-2026) Service Manual / Instrument Panels and Pedals / Trim - Dash - Driver's Side - Lower (Remove and Replace)
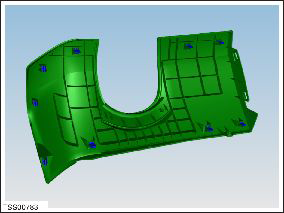
Removal
- Remove the LH instrument panel side cover (refer to procedure).
- Remove the screw that secures the footwell cover to the instrument panel trim panel (torque 2 Nm).
- Using a suitable tool, release the clips (x9) that secure the
trim to the dash.
Caution: Take care not to damage component(s).
Caution: Replace any broken clips.
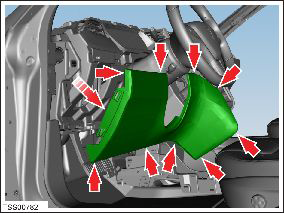
- Remove the trim from the dash assembly.
Trim - Dash - Driver's Side - Inner to Bezel (Remove and Replace)
RemovalRemove driver side inner face vent (refer to procedure)
Installation
Installation procedure is the reverse of removal.
READ NEXT:
 Assembly - Cover - Footwell - LH (Remove and Replace)
Removal
Fully open the driver's door.
Move the driver's seat rearward for access.
Remove the LH center console closeout extension (refer to
procedure)
Remove the screws (x2) t
Assembly - Cover - Footwell - RH (Remove and Replace)
Removal
Fully open the passenger door.
Move the passenger seat rearward for access.
Remove the screws (x2) that secure the footwell cover to the
dash (torque 2 Nm).
Assembly - Cover - Footwell - LH (RHD) (Remove and Replace)
Removal
Fully open the passenger door.
Move the passenger seat rearward for access.
Remove the LH center console closeout extension (refer to
procedure).
Release the clips (x4
SEE MORE:
Module - Air Suspension - ECU (RHD) (Remove and Install)
Warning: If the 12V power supply is disconnected, do
not attempt to open any doors with door glass in closed position.
Failure to follow this instruction could result in door glass
shatter.
Note: Before disconnecting the 12V power supply,
ensure that the driver's door window
200A Fuses - Wall Connector (Remove and Replace) - Removal
Removal
Warning: Only technicians who have been trained in High
Voltage Awareness are permitted to perform this procedure.
Proper personal protective equipment (PPE) and insulating HV
gloves with a minimum rating of class 00 (500V) must be worn any
time a high volta
© 2019-2026 Copyright www.tesms.org
