Tesla Model S: Back Rest Assembly - Seat - 2nd Row - RH (Remove and Install)
Tesla Model S (2012-2026) Service Manual / Seats / Back Rest Assembly - Seat - 2nd Row - RH (Remove and Install)
Removal
- Remove RH rear seat bolster (refer to procedure)
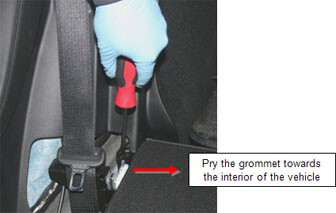
- Use a pry tool to release the grommet that secures the RH 2nd
row backrest.
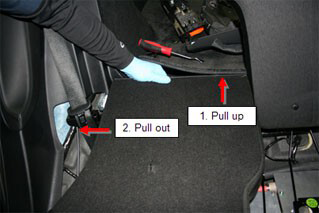
- Pull up on the RH backrest, then pull it outwards to disconnect
it from the LH backrest.
- Remove rear seat back rest assembly.
READ NEXT:
 Back Rest Assembly - 2nd Row - Executive (Remove and Replace)
Removal
Remove the LH and RH lower seat cushions (refer to procedure).
On each side of the vehicle, remove the screw that secures the
closeout panel to the seat frame (to
Assembly - Back Rest - Driver's Seat (Remove and Replace)
Removal
Remove driver's seat assembly (refer to procedure)
Place seat on clean work surface.
Remove screw securing outer side cover to seat (torque 1 Nm).
Frame - Seat Base - 2nd Row Cushion (Remove and Replace)
Removal
Remove the seat cushion (refer to procedure).
Remove the LH rear seat back rest assembly (refer to procedure).
Remove the RH rear seat back rest assembly (refer to procedu
SEE MORE:
Actuator - Inlet (Remove and Replace)
Removal
Remove glove box assembly (refer to procedure)
Disconnect actuator harness connector.
Remove screws (x3) securing recirculation actuator to HVAC
assembly (torque 1 Nm).
Remove recirculation actuator.
Caution: Take care not to damage component(s).
Receiver Dryer and Desiccant (Remove and Replace)
Note: The desiccant bag in the receiver dryer is a
serviceable item and must be replaced every 2 years, whenever the
system is opened to ambient air for an extended time, or when an A/C
system leak has been fixed.
Note: The dessicant is located in the RH condenser.
Removal
© 2019-2026 Copyright www.tesms.org
