Tesla Model S: Badge - Ludicrous Speed (Retrofit)
Tesla Model S (2012-2026) Service Manual / Exterior fittings / Badge - Ludicrous Speed (Retrofit)
Special tool required for this procedure:
| Supplier | Part Number | Description |
| Tesla | 1054190-00-A | FEELER GAUGES |
Note: This procedure only applies to retrofitting the Ludicrous Speed badge on vehicles that already have the Performance battery badge installed. If installing the Performance battery badge and Ludicrous Speed badge together, refer to procedure 12050602 (refer to procedure).
- Use alcohol wipes to thoroughly clean the area below the battery badge. Wait until the area is fully dry before continuing this procedure. Caution: Care must be taken to avoid damage to paintwork and exterior trim.
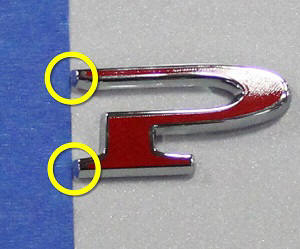
- Affix a piece of masking tape vertically so that the right side
of the tape touches the upper and lower left points of the "P"
badge.
- Peel off the plastic front badge carrier from the "Ludicrous Speed" badge.
- Remove the plastic backing from the "Ludicrous Speed" badge.
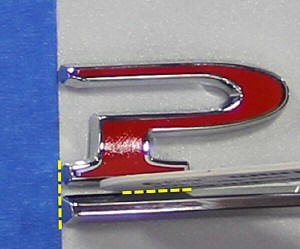
- Place a 1 mm feeler gauge at the base of the "P" badge. Affix
the LH edge of the "Ludicrous Speed" badge so that the top of the
badge is flush with the feeler gauge and the LH side of the badge is
flush with the masking tape.
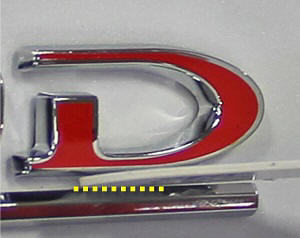
- Place a 1 mm feeler gauge at the base of the "D" badge. Affix
the RH edge of the "Ludicrous Speed" badge so that the top of the
badge is flush with the feeler gauge.
- Firmly apply pressure all along the "Ludicrous Speed" badge to ensure that it is secured to the liftgate.
- Remove the masking tape and clean any leftover residue.
READ NEXT:
 Bracket - License Plate - Front (Retrofit)
Special tool required for this procedure:
Supplier
Part Number
Description
Door Mirror Assembly - LH (Remove)
Removal
Lower the front window glass.
Remove the door trim panel (refer to procedure).
Carefully release the clips (x2) that secure the front top end
of the flap seal to the door.
SEE MORE:
Headlining - Panoramic Roof (Remove and Replace)
Removal
Remove front windshield (refer to procedure)
Lower headlining for access (refer to procedure)
With assistance remove headlining through front windshield
opening.
Remove rear map lamps from headlining.
Collision Avoidance Assist
The following collision avoidance features are designed
to increase the safety of you and your passengers:
Forward Collision Warning - provides visual and
audible warnings in situations when Model S detects
that there is a high risk of a frontal collision.
Automatic Emergency Braking - autom
© 2019-2026 Copyright www.tesms.org
