Tesla Model S: Fascia Assembly - Rear (Remove and Replace)
Tesla Model S (2012-2026) Service Manual / Body / Fascia Assembly - Rear (Remove and Replace)
Removal
- Remove the rear fascia for access (refer to procedure).
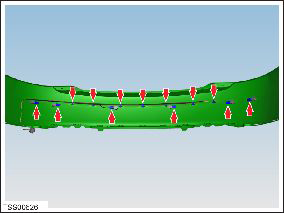
- Remove the bolts (x4) and plastic rivets (x2) that secure the diffuser tray to the rear fascia (torque 3 Nm).
- Release the clips (x15) that secure the rear fascia to the
diffuser and applique.
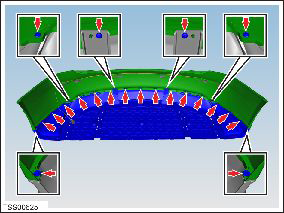
- Remove the rear diffuser and applique.
- Disconnect the parking distance sensor connectors (x4 or x6).
- Release the clips (x7) that secure the harness to the rear
fascia. Remove the harness.
- Carefully release the parking distance sensors (x4 or x6) from
the rear fascia retaining rings.
- Carefully release and remove the sensor retaining rings (x4 or x6) from the rear fascia. Caution: Care must be taken to avoid damage to paintwork and exterior trim.
Check the alignment of the rear fascia to the body. Adjust as necessary.
READ NEXT:
 Bumper Assembly - Rear (Remove and Replace)
Removal
Remove the rear fascia assembly for access (refer to procedure).
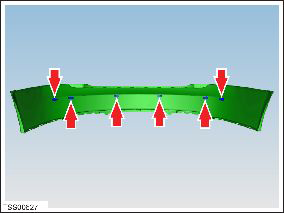
Remove the bolts (x8) that secure the bumper to the body (torque
52 Nm).
Diffuser Trim - Rear (Remove and Replace)
Removal
Remove rear diffuser (refer to procedure)
Remove plastic rivets (x2) and screw (x1) securing diffuser trim
to applique (torque 3 Nm).
Carrier - Bumper - Front (Remove and Replace)
Warning: If the vehicle has air suspension, activate "Jack"
mode on the touchscreen before raising and supporting the vehicle.
Removal
Recover refrigerant from the vehicle (refer
SEE MORE:
Passive Locking and Unlocking
Locking and unlocking Model S with your key fob is
conveniently hands-free. Although you must be carrying
a paired key fob, there is no need to use it. Model S has
sensors around the vehicle that can recognize the
presence of a key fob within a range of approximately
six feet (two meters). Ther
Air pressure in tires very low
PULL OVER SAFELY - Check for flat tire
This alert indicates that one or more of the tires on your vehicle is
extremely low or flat.
The tire pressure monitoring system (TPMS) has detected that the air pressure in
one or more of your tires is
significantly lower than the recommended cold tire pre
© 2019-2026 Copyright www.tesms.org
