Tesla Model S: Bash Plate - Front - Stamping (Remove and Replace)
Tesla Model S (2012-2026) Service Manual / Chassis / Bash Plate - Front - Stamping (Remove and Replace)
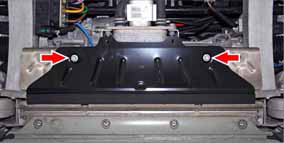
Removal
- Remove the front aero shield panel (refer to procedure).
- Remove the bash plate extrusion (refer to procedure).
-
Remove and discard the bolts (x2), shoulder
washers (x2), and washers (x2) that secure the bash plate stamping
to the front subframe skid plate (9 Nm).
- Remove the bash plate stamping.
Installation procedure is the reverse of removal.
Note: Use new hardware to install the bash plate stamping. Do not reuse any hardware.
READ NEXT:
 Bash Plate - Front - Extrusion (Remove and Replace)
Removal
Raise and support the vehicle
(refer to procedure).
Remove and discard the bolts (x2) that secure
the bash plate extrusion to the front subframe (10 Nm).
SEE MORE:
Starting/Discharging the System
Starting the System
Press the emergency stop button to disable HV systems.
Pull out the display/keyboard/trackpad tray.
Press the red power button to turn on the on-board PC.
Follow the onscreen instructions to log in to the system.
Userna
Assembly - Finisher - Instrument Panel - RH (Remove and Replace)
Removal
Remove the glove box assembly (refer to procedure).
In the upper area behind the glove box, remove the 2 screws
(torque 10 Nm) that secure the passenger airbag to the crossbar
beam.
Caution: The
© 2019-2026 Copyright www.tesms.org
