Tesla Model S: Buckle Assembly - 1st Row - LH (Remove and Replace)
Tesla Model S (2012-2026) Service Manual / Safety and Restraint / Buckle Assembly - 1st Row - LH (Remove and Replace)
Removal
- Open door.
- Power seat adjust rearwards and upwards for access.
- Remove screw securing inner cover to seat.
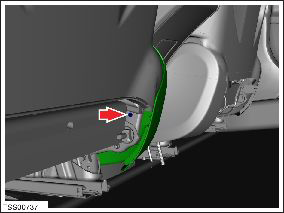
- Carefully release inner cover from retaining bracket.
Note: Center console removed for clarity.
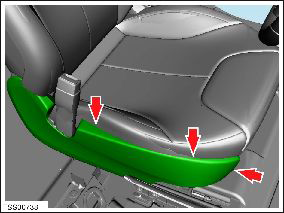
- Release clip securing seat harness to cover.
- Remove inner cover.
- Disconnect seat belt buckle connector and harness.
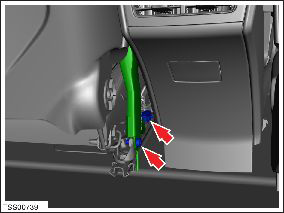
- Remove bolt securing seat belt buckle to seat frame (torque 48 Nm).
- Remove seat belt buckle.
READ NEXT:
 Seat Belt Assembly - 2nd Row - LH (Remove and Replace)
Warning: If the 12V power supply is disconnected, do
not attempt to open any doors with door glass in closed
position. Failure to follow this instruction could result in
door glass shat
Buckle Assembly - 2nd Row - LH (Remove and Replace)
Warning: Prior to disconnection of 12 volt power supply,
ensure driver's door glass is in the fully open position. Failure to
follow this instruction could result in vehicle lockout.
Warni
Seat Belt Assembly - 2nd Row - Center (Remove and Replace)
Removal
Remove the 2nd row seat cushion (refer to procedure)
Carefully release pegs (x2) securing seatbelt trim to seat back.
SEE MORE:
Shift Using the Center Console
In addition to manually shifting on the touchscreen, you
can shift by pressing P, R, N or D located on the center
console. In most situations, these buttons are not
available until you press one of the buttons to activate it.
When active, the LEDs associated with each button
illuminate and when
Pull onto the Flatbed Truck From
Front (Without Tow Eye)
CAUTION: To avoid damage, only pull the vehicle
onto a flatbed truck using a properly-installed tow
eye. Using the chassis, frame, or suspension
components to pull the vehicle can result in
damage.
WARNING: If the vehicle is pulled onto the flatbed
truck using this method, all suspensi
© 2019-2026 Copyright www.tesms.org
