Tesla Model S: Bushing Installation, Rear Motor Mount
Tesla Model S (2012-2026) Service Manual / Rear Drive Unit / Bushing - Drive Unit - Rear (Remove and Replace) / Bushing Installation, Rear Motor Mount
- Use brake cleaner to clean the threaded rod and the nut bearing assemblies.
- Use 3M Spray Lube 08878 or equivalent to lubricate the threaded rod and the nut bearing assemblies.
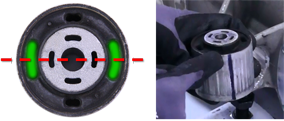
- Slide the bushing into the right side of the rear motor mount so
that the longer cavities are horizontal on the bushing.
Tip: Draw a reference line on the bushing prior to installation to aid with orientation.
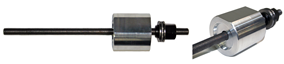
- Thread 1 nut bearing assembly onto 1 end of the threaded rod.
- Slide the driver onto the other end of the threaded rod so that
the side of the driver with the single tapered counterbore faces
away from the nut bearing assembly.
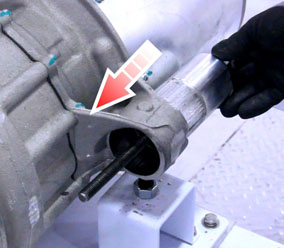
- Slide the other end of the threaded rod through the right side
of the rear bushing.
- Slide the rear bushing cup onto the other end of the threaded rod.
- Thread the second nut bearing assembly onto the other end of the threaded rod until it lightly touches the driver.
- Adjust the assembly until the rear bushing cup is seated flush against the rear motor mount.
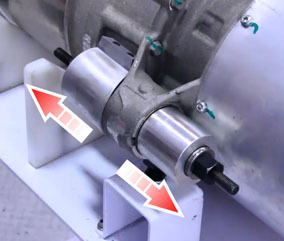
- Place a 1 in (24 mm) ratchet wrench onto each nut bearing assembly.
- Alternate rotating the ratchet wrenches to push the driver
towards the rear bushing cup until the bushing is aligned with the
machined face of the motor mount (the bushing is slightly visible
from the right side of the front motor mount).
Caution: If the effort required to rotate the ratchet wrenches is excessive, the tool is misaligned and continued ratcheting could cause damage. Loosen the nut bearing assemblies on the threaded rod, add lubrication to the threaded rod, realign the parts, and begin again.
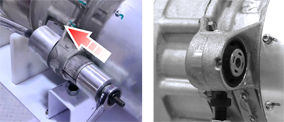
- Disassemble and remove the tool from the bushing and the rear
motor mount.
READ NEXT:
 Sensor - Motor - Speed (Remove and Replace)
Removal
Remove the mid aero shield (refer to procedure).
Disconnect the speed sensor connector.
Remove the bolt that secures the speed sensor to the end bell
(torque 8 Nm).
Gearbox Fluid - Large Rear Drive Unit (Remove and Replace)
Warning: If the vehicle has air suspension,
activate "Jack" mode on the touchscreen before raising and
supporting the vehicle.
Drain & Refill
Raise and support the vehicle (refe
Gearbox Fluid - Small Rear Drive Unit (Remove and Replace)
Warning: If the vehicle has air suspension, activate "Jack"
mode on the touchscreen before raising and supporting the vehicle.
Drain & Refill
Position the vehicle in preparation for
SEE MORE:
Bolster - Side - Seat - 2nd Row - LH (Remove and Replace)
Removal
Fully open the LH rear door.
Release the LH rear seat back rest lock and push the rear seat
back rest flat for access.
Insert a wedge tool behind the bolster to provide outward
pressure.
Use a long s
Charge Port - 3 Phase - Manual Release of Cable
Note: This procedure describes how to manually release a
cable from the 3 phase charge port. If the vehicle is equipped with
a single phase charge port, refer to procedure 44013005 (refer to
procedure).
Warning: Only technicians who have been trained in High
Voltage Awareness a
© 2019-2026 Copyright www.tesms.org
