Tesla Model S: Skidplate - Front (Remove and Replace)
Tesla Model S (2012-2026) Service Manual / Chassis / Skidplate - Front (Remove and Replace)
Warning: If the vehicle has air suspension, activate "Jack" mode on the touchscreen before raising and supporting the vehicle.
Removal
- Remove front aero shield (refer to procedure).
- If equipped, remove the bash plate stamping (refer to procedure).
-
Remove the bolts (x7) that secure the skid
plate to the front subframe (torque 9 Nm).
Note: If the vehicle was equipped with the bash plate stamping, the hardware quantity will vary.
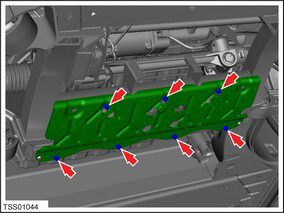
-
Remove the bolts (x2) that secure the HV
Battery to the front subframe and body (torque 115 Nm).
.png)
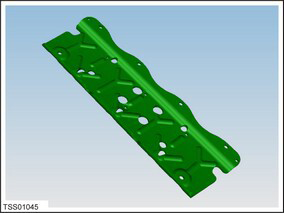
- Use an appropriate tool to pry the skidplate out from between the front subframe and the HV Battery. Caution: Take care not to damage component(s).
-
Remove the skid plate from the vehicle.
Installation procedure is the reverse of removal.
READ NEXT:
 Skidplate - Rear (Remove and Replace)
Removal
Remove rear diffuser tray
(refer to procedure)
Remove screws (x2) securing rear skid plate to
subframe (torque 10 Nm).
In
Skid Bar - Front Subframe (Remove and Replace)
Removal
Remove the front aero shield panel
(refer to procedure).
Remove and discard the inner bolts (x2) that
secure the skid bar to the front subframe (10 Nm).
Bash Plate - Front - Stamping (Remove and Replace)
Removal
Remove the front aero shield panel
(refer to procedure).
Remove the bash plate extrusion
(refer to procedure).
Remove and discard the bolts (x2), shoulder
SEE MORE:
Heater - PTC (Dual Motor) (Remove and Replace)
Warning: Only technicians who have been trained in High
Voltage Awareness are permitted to perform this procedure. Proper
personal protective equipment (PPE) and insulating HV gloves with a
minimum rating of class 00 (500V) must be worn any time a high
voltage cable is handled. Refer
Horn - 2nd Generation (Remove and Replace)
Removal
Remove the active center louver assembly (refer to procedure).
Place the active center louver assembly on a soft, clean surface
with the front of the duct assembly facing down.
Release the bolt that secures the horn bracket to the active
center louver assembly as
© 2019-2026 Copyright www.tesms.org
