Tesla Model S: Charge Port - 3 Phase - Manual Release of Cable
Note: This procedure describes how to manually release a cable from the 3 phase charge port. If the vehicle is equipped with a single phase charge port, refer to procedure 44013005 (refer to procedure).
Warning: Only technicians who have been trained in High Voltage Awareness are permitted to perform this procedure. Proper personal protective equipment (PPE) and insulating HV gloves with a minimum rating of class 00 (500V) must be worn any time a high voltage cable is handled. Refer to Tech Note TN-15-92-003, "High Voltage Awareness Care Points" for additional safety information.
Release Cable
- Perform the vehicle electrical isolation procedure (refer to procedure).
- Remove the LH trunk trim (refer to procedure).
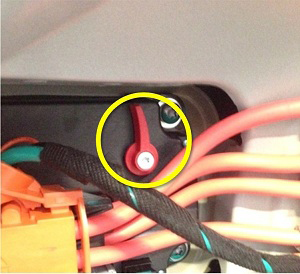
- Press the release lever towards the front of the vehicle and
hold it in place while an assistant removes the charge cable
from the charge port. Once the charge cable is removed, release
the lever.
Reinstall all components that were removed for access.
READ NEXT:
 Door - Charge Port - Non-Motorized (Remove and Replace)
Removal
Remove the LH tail light assembly (refer to procedure).
Remove the screws (x3) that secure the charge port door to the
tail light assembly.
Door - Charge Port - Single Phase - Motorized (Remove and Replace)
Note: The charge port door and motor are removed as an
assembly.
Removal
Remove the LH tail light assembly (refer to procedure).
Remove the screws (x3) that secure the charg
Slave Charger - LH - 1st Generation (Remove and Replace)
Note: This procedure describes how to remove and install
the 1st generation slave charger. If the vehicle is equipped with a
2nd generation slave charger, refer to procedure 44102102 (refer to
SEE MORE:
Fan - Condenser - LH (Remove and Replace)
Removal
Recover refrigerant from the vehicle (refer to procedure).
Remove the front wheel arch liner (refer to procedure).
Remove the bolts (x2) and remove the front bumper support bar
(torque 11 Nm).
Remove the
Module - Air Suspension - ECU (Remove and Replace)
Warning: If the 12V power supply is disconnected, do
not attempt to open any doors with door glass in closed position.
Failure to follow this instruction could result in door glass
shatter.
Note: Before disconnecting the 12V power supply,
ensure that the driver's door window
