Tesla Model S: Curtain Air bag - Driver's (Remove and Replace)
Warning: If the 12V power supply is disconnected, do not attempt to open any doors with door glass in closed position. Failure to follow this instruction could result in door glass shatter.
Note: Before disconnecting the 12V power supply, ensure that the driver's door window is fully open. Failure to follow this instruction could result in vehicle lockout.
Removal
- Disconnect 12V power.
- Rear wheel drive (RWD): Refer to procedure.
- Dual Motor: Refer to procedure.
- Lower the headlining trim for access (refer to procedure).
- Disconnect the curtain airbag harness connector.
Warning: To avoid personal injury, observe all relevant safety precautions before removing or testing any SRS components.
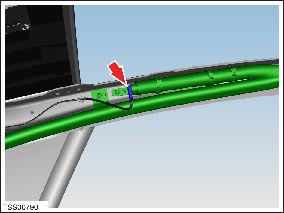
- Remove the screws (x9) that secure the curtain airbag to the body (torque 10 Nm).
- Remove the clip that secures the pyrotechnic to the cantrail.
- Release the airbag location pegs (x5) from the cantrail.
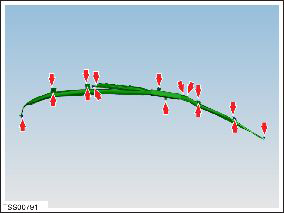
- Remove the curtain airbag assembly.
Warning: Store the air bag module with the deployment side facing up. This will prevent it from being propelled if accidentally deployed, which might cause injury.
InstallationInstallation procedure is the reverse of removal.
Side Air bag - Driver's (Remove and Replace)
Note: The side air bag is a component within the seat back rest assembly. If the side air bag needs to be replaced, the whole seat back rest assembly must be replaced.Removal
Remove the seat back rest assembly (refer to procedure).
Installation
Installation procedure is the reverse of removal.
READ NEXT:
 Seat Belt Assembly - 1st Row - LH (Remove and Replace)
Warning: If the 12V power supply is disconnected, do
not attempt to open any doors with door glass in closed
position. Failure to follow this instruction could result in
door glass shat
Buckle Assembly - 1st Row - LH (Remove and Replace)
Removal
Open door.
Power seat adjust rearwards and upwards for access.
Remove screw securing inner cover to seat.
C
Seat Belt Assembly - 2nd Row - LH (Remove and Replace)
Warning: If the 12V power supply is disconnected, do
not attempt to open any doors with door glass in closed
position. Failure to follow this instruction could result in
door glass shat
SEE MORE:
Wireless Phone Chargers
Wireless phone chargers are integrated into both the
front and rear consoles, each providing up to 15W of
power to charge Qi-enabled phones. Simply place your
phone on the charger. Your device may feel warm while
charging, but this is a normal effect of inductive
charging.
When placed on the w
Finisher - Floor - Center Console (Remove and Replace)
Special tool required for this procedure:
Supplier
Part Number
Description
Tesla
1065399-00-A
Skin Wedge Tool
Removal
If equipped, remove
