Tesla Model S: DCDC Converter - 1st Generation (Remove and Replace)
Warning: Only technicians who have been trained in High Voltage Awareness are permitted to perform this procedure. Proper personal protective equipment (PPE) and insulating HV gloves with a minimum rating of class 00 (500V) must be worn any time a high voltage cable is handled. Refer to Tech Note TN-15-92-003, "High Voltage Awareness Care Points" for additional safety information.
Warning: To avoid personal injury or equipment damage from electrostatic discharge, an ESD wrist strap must be worn while carrying out this procedure.
Removal
- Perform the vehicle electrical isolation procedure (refer to procedure).
- Remove the front RH upper wheel arch liner (refer to procedure).
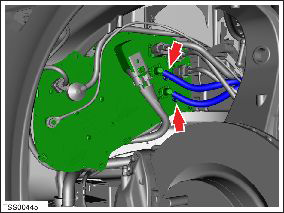
- Clamp the DCDC converter feed and return coolant hoses.
- Position a container to collect the coolant.
- Release the clips (x2) that secure the feed and return coolant
hoses to the DCDC converter. Release the hoses from the converter.
Caution: Plug pipe connections to prevent ingress of moisture or dirt.
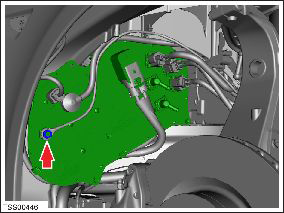
Note: Note installed position of components before removal.
- Remove the nut and washers that secure the 12V ground terminal
to the DCDC converter (torque 16 Nm). Release the harness and move
it aside.
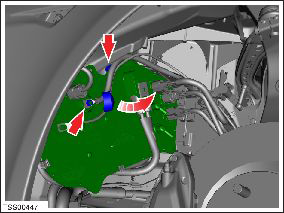
- Release the DCDC converter 12V positive terminal insulation cover.
- Remove the nut and washers securing the 12V positive terminal to the DCDC converter (torque 9 Nm). Release the harness and move it aside.
- Release the clip that secures the harness to the DCDC converter.
Warning: Ensure that the multimeter and leads are capable of handling at least 500V.
- Remove the bolt that secures the HV connector cover (torque 18 Nm).
- Use a multimeter to check voltages across the HV cables and to
ground:
- B+ to ground
- B- to ground
- B+ to B- Warning: If any voltage reading is more than 10V, the high voltage contactors are not fully opened. Due to the risk of electrocution, contact Service Engineering before performing any further work.
- Disconnect the HV harness from the DCDC converter (torque 5 Nm).
- Disconnect the HV harness connectors (x3) that secure the battery coolant, electric heater, cabin heater and compressor to the DCDC converter. Note: Note installed position of components before removal.
- Disconnect the signal harness connector from the DCDC converter.
- Release the clips (x3) that secure the harness to the DCDC
converter.
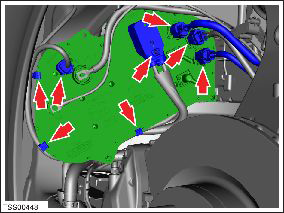
- Remove the bolt and nuts (x2) that secure the DCDC converter to
the body (torque 9 Nm).

- Remove the DCDC converter from the vehicle.
Installation procedure is the reverse of removal, except for the following:
Warning: Only use cleaning agents and solvents in a well-ventilated area.
Note: Clean the affected areas before installation.
- Refill and bleed the cooling system (refer to procedure).
- If necessary, perform a full firmware update.
READ NEXT:
 DCDC Converter - 2nd Generation (Remove and Replace)
Warning: Only technicians who have been trained in High
Voltage Awareness are permitted to perform this procedure. Proper
personal protective equipment (PPE) and insulating HV gloves with a
DCDC Converter (Dual Motor) (Remove and Replace)
Warning: Only technicians who have been
trained in High Voltage Awareness are permitted to perform this
procedure. Proper personal protective equipment (PPE) and insulating
HV gloves with
Forward Junction Box - 2nd Generation (Remove and Replace)
Warning: Only technicians who have been trained in High
Voltage Awareness are permitted to perform this procedure. Proper
personal protective equipment (PPE) and insulating HV gloves with a
SEE MORE:
Switch - Brake Light (Remove and Replace)
Removal
Remove the driver's side lower dash trim (refer to procedure).
Rotate the brake light switch 45 degrees clockwise and release
it from the brake pedal assembly.
Caution: The brake light switch is a one time use
component. Ensure that a new switch is used
Brake Lines - Booster to ABS (Dual Motor) (RHD) (Remove and Replace)
Removal
Recover the A/C refrigerant from the vehicle
(refer to procedure).
Remove the 12V battery bracket beam
(refer to procedure).
Release the fasteners (x2) that secure the fuse
box to the front crossmember (torque 6 Nm).
