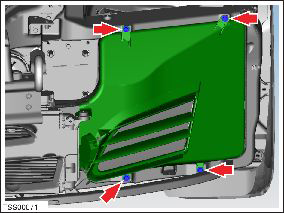
Tesla Model S: Duct - Condenser LH (Remove and Replace)
Tesla Model S (2012-2026) Service Manual / Thermal Management / Duct - Condenser LH (Remove and Replace)
Removal
- Remove the front fascia assembly (refer to procedure).
- Remove the bolts (x4) that secure the duct to the condenser
housing (torque 16 Nm on vehicles equipped with a magnesium Carrier,
torque 4 Nm on vehicles equipped with a composite Carrier).

- Remove the duct from the bracket.
Installation procedure is the reverse of removal, except for the following:
- Power cycle the thermal controller:
- Remove the Thermal System Controls fuse (F22).
- Wait approximately 30 seconds.
- Reinstall fuse F22.
- In the Toolbox "Louver Shutter Operation" panel, run the "Recalibrate Louver Shutters" procedure in Toolbox.
READ NEXT:
 Motor - Active Louver - Front Fascia (Remove and Replace)
Removal
Remove front fascia active louver vent (refer to procedure)
Remove screws (x3) securing louver drive motor to vent assembly
(torque 1 Nm).
 Vent - Motorized - Front Fascia - LH (Remove and Replace)
Removal
If the vehicle is equipped with 1st generation front fascia
applique, remove front fascia applique (refer to procedure) .
Remove ankle catcher foam, if equipped.
SEE MORE:
 Shield - Dust - Brake - Rear - LH (Remove and Replace)
Warning: If the vehicle
has air suspension, activate "Jack" mode on the touchscreen before
raising and supporting the vehicle.
Removal
Remove the rear hub (refer
to procedure).
Remove the screws (x3) that secure the rear
brake dust shield to the knuckle
 Map Display
Touch these icons to customize what the map displays:
Display/hide satellite imagery
(if equipped
with premium connectivity).
Display/hide traffic conditions
(if equipped
with premium connectivity). Green lines
indicate no traffic; orange lines indicate
light traffic; red lines indicate moder
© 2019-2026 Copyright www.tesms.org

