Tesla Model S: Bumper Assembly - Rear (Remove and Replace)
Tesla Model S (2012-2026) Service Manual / Body / Bumper Assembly - Rear (Remove and Replace)
Removal
- Remove the rear fascia assembly for access (refer to procedure).
- Remove the bolts (x8) that secure the bumper to the body (torque
52 Nm).
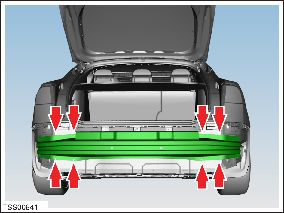
- Remove the rear bumper assembly.
Installation procedure is the reverse of removal.
READ NEXT:
 Diffuser Trim - Rear (Remove and Replace)
Removal
Remove rear diffuser (refer to procedure)
Remove plastic rivets (x2) and screw (x1) securing diffuser trim
to applique (torque 3 Nm).
Carrier - Bumper - Front (Remove and Replace)
Warning: If the vehicle has air suspension, activate "Jack"
mode on the touchscreen before raising and supporting the vehicle.
Removal
Recover refrigerant from the vehicle (refer
Strut - Shock Tower to Bulkhead - LH (Remove and Replace)
Removal
Ensure that the wipers are in the off position by rotating the
end of the left-hand steering column lever towards the rear of the
vehicle.
Open the hood to the service pos
SEE MORE:
Handle and Cable Assembly - 40A Wall Connector (Remove and Replace)
Note: This procedure describes how to remove and replace
the 40A Wall Connector handle and cable assembly. For instructions
on how to remove and replace the 80A Wall Connector handle and cable
assembly, refer to procedure 50022002 (refer to procedure).
Removal
Warning
Mount - Front Drive Unit - LH (Adjust)
Note: This procedure assumes that the RH mount has been
replaced, but that the shim tools cannot be repositioned to verify
proper clearance. If this happens, follow this procedure to adjust
the LH side motor mount.
Release the 2 bolts that secure the 4-way valve bracket to the body.
© 2019-2026 Copyright www.tesms.org
