Tesla Model S: Filter - Particulate (Remove and Replace)
Tesla Model S (2012-2026) Service Manual / Thermal Management / Filter - Particulate (Remove and Replace)
Removal
- Remove the rear center underhood apron (refer to procedure).
- Release the retainers (x2) that secure the particulate filter
cover.
Note: Components have been removed in this graphic to aid clarity.
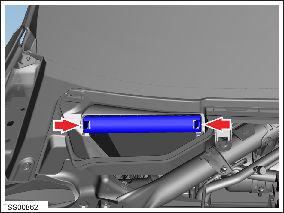
- Remove the particulate filter cover.
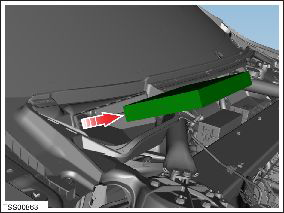
- Remove the particulate filter.
Installation procedure is the reverse of removal, except for the following:
Note: Clean the affected areas before installation.
Caution: Care must be taken to ensure that the particulate filter is not kinked or twisted during installation.
Ensure that the filter housing components are assembled correctly.
READ NEXT:
 HVAC Assembly (Remove and Replace)
Removal
Remove cross car beam (refer to procedure).
Recover refrigerant from AC system (refer to procedure).
Disconnect AC connection to HVAC, discard 'O' rings (torque 22
Nm).
Actuator - Inlet (Remove and Replace)
Removal
Remove glove box assembly (refer to procedure)
Disconnect actuator harness connector.
Remove screws (x3) securing recirculation actuator to HVAC
assembly (torque 1 Nm).
Actuator - Driver's Temperature (Remove and Replace)
Removal
Remove IP carrier (refer to procedure)
Disconnect duct temperature sensor harness connector.
Remove screw securing duct to HVAC assembly and position duct
aside (torque 1
SEE MORE:
Underhood Storage Unit (Dual Motor) (Remove and Replace)
Removal
Remove the underhood aprons.
Peel back the carpeting at the rear of the underhood storage
unit. Release the bolts (x2) (torque 8 Nm).
Peel back the carpeting at the front of the underhood storage
unit.
Selecting Between Driver Profiles
To adjust Model S based on a
driver's
profile, touch the driver profile icon at the
top of the Controls screen. Then choose
the driver, and Model S is adjusted based
on the settings that have been saved to the
chosen driver profile. See Using Tesla
Profiles to learn more about
saving profil
© 2019-2026 Copyright www.tesms.org
