Tesla Model S: Glove Box (Remove and Replace)
Tesla Model S (2012-2026) Service Manual / Instrument Panels and Pedals / Glove Box (Remove and Replace)
Removal
- Remove the RH lower instrument panel (refer to procedure)
- Remove the lower glove box panel by releasing the trim clips
(x6).
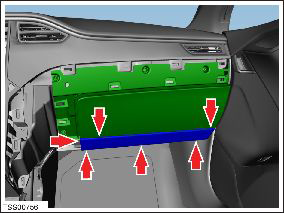
- Open the glove box.
- Remove the 6 screws that secure the glove box.
- Release the glove box assembly. Caution: Do not damage the 3 harness connections that are attached to back of the glove box.
- Disconnect the 3 harness connections from the back of the glove
box.
- Remove the glove box.
- Secure the 3 harness connections on the back of the glove box.
- Place the glove box into its assembly.
- Open the glove box.
- Loosely secure the 6 bolts.
- Hold the bottom of the glove box to bear the entire weight of the glove box.
- Tighten the lower center bolt.
- Tighten the left and right lower bolts.
- Tighten the upper bolts.
- Verify normal glove box operation.
READ NEXT:
 Glove Box - Latch Release (Remove and Replace)
Removal
Remove glove box assembly (refer to procedure)
Remove screws (x3) securing latch release module to glove box
assembly.
Glove Box - Damper (Remove and Replace)
Removal
Remove glove box assembly (refer to procedure)
Depress clip and remove clevis pin securing damper module to
glove box assembly.
IP Carrier (Remove and Replace)
Warning: If the 12V power supply is disconnected, do
not attempt to open any doors with door glass in closed position.
Failure to follow this instruction could result in door glass
shat
SEE MORE:
Brake Pedal (Remove and Replace)
Removal
Remove the brake light switch (refer to procedure).
Caution: The brake light switch is a one time use
component. Ensure that a new switch is used during
reinstallation.
Remove the spring clip from the clevis pin.
Depress the brake
Frame - Panoramic Roof Assembly (Remove and Replace) -
Removal
Warning: To avoid
personal injury, wear cut-resistant gloves when performing this
operation.
Special tools required for this procedure:
Supplier
Part Number
Description
© 2019-2026 Copyright www.tesms.org
