Tesla Model S: Handle - Interior Release - Door - Front - LH (Remove and Replace)
Tesla Model S (2012-2026) Service Manual / Closures / Handle - Interior Release - Door - Front - LH (Remove and Replace)
Removal
- Remove front door trim panel (refer to procedure)
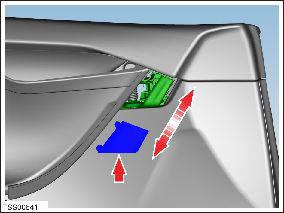
- Release clips and remove door pad finisher.
Caution: Take care not to damage component(s).
- Remove screws (x3) and nut (x1) securing interior door handle to
trim pad (torque 3 Nm).
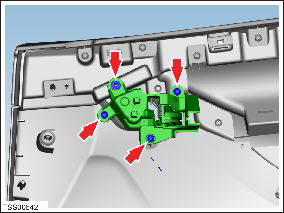
- Release and remove door handle.

Installation procedure is the reverse of removal.
READ NEXT:
 Handle - Interior Release - Door - Rear - LH (Remove and Replace)
Removal
Remove the rear door trim panel (refer to procedure).
Remove the screws (x3) and the nut (x1) that secure the interior
door handle to the trim pad (torque 3 Nm).
Handle - Exterior Release - Door - Front - LH (Remove and Replace)
Removal
Remove regulator assembly (refer to procedure)
Make sure exterior release handle is fully retracted.
Disconnect handle harness connector.
Remove nuts (x4) securing door re
Handle - Exterior Release - Door - Rear - LH (Remove and Replace)
Removal
Remove regulator assembly (refer to procedure)
Make sure exterior release handle is fully retracted.
Disconnect handle harness connector.
Remove nuts (x4) securing door re
SEE MORE:
DCDC Converter - 1st Generation (Remove and Replace)
Warning: Only technicians who have been trained in High
Voltage Awareness are permitted to perform this procedure. Proper
personal protective equipment (PPE) and insulating HV gloves with a
minimum rating of class 00 (500V) must be worn any time a high
voltage cable is handled. Refer
Motor - Seat Height - Driver's Seat (Remove and Replace)
Removal
Power the seat fully upward, away from the floor.
Remove the driver's seat outer side cover (refer to procedure).
Disconnect the seat height motor connector and harness.
Remove the outboard nuts (x3) that secure the seat height motor
to the seat (torque 8 Nm).
© 2019-2026 Copyright www.tesms.org
