Tesla Model S: Master Charger - RH - 1st Generation (Remove and Replace)
Note: This procedure describes how to remove and install the 1st generation master charger. If the vehicle is equipped with a 2nd generation master charger, refer to procedure 44102202 (refer to procedure).
Warning: Only technicians who have been trained in High Voltage Awareness are permitted to perform this procedure. Proper personal protective equipment (PPE) and insulating HV gloves with a minimum rating of class 00 (500V) must be worn any time a high voltage cable is handled. Refer to Tech Note TN-15-92-003, "High Voltage Awareness Care Points" for additional safety information.
Warning: To avoid personal injury, eye protection must be worn while using compressed air.
Removal
Note: The slave charger is not installed in the vehicle unless it was requested as an option. The graphics may show both options, Master and Slave chargers, during this procedure.
- Remove the HV junction box (refer to procedure) .
- Disconnect the harness.
- Peel back the carpet for access to the bolts.
- Remove the nuts (x4) that secure the charger to the floor panel
(torque 6.5 Nm).
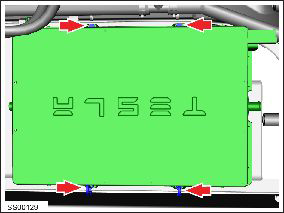
- Remove the bolt that secures the ground strap to the charger casing (torque 6.5 Nm).
- Position the ground strap aside.
- Clamp both hoses as close to the charger as possible to minimize
coolant loss. Release the hose clips (x2).
Note: Place suitable absorbent material around the affected area to absorb any possible fluid spillage.
Caution: Plug component open ports and disconnected hoses to prevent coolant loss.
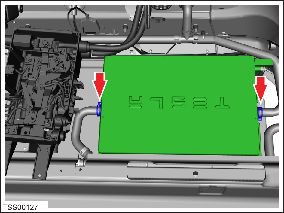
- Disconnect both coolant hoses, tilt the charger ports upward, and plug immediately.
- Remove the charger.
- If the charger is being shipped or stored, allow the coolant to drain from the charger, then use compressed air lightly to blow out any remaining coolant.
Caution: Do not exceed 25 PSI when using compressed air to blow out any remaining coolant.
InstallationInstallation procedure is the reverse of removal, except for the following:
- Refill and bleed the cooling system (refer to procedure) .
- If either charger is being replaced, it will be necessary to update the vehicle firmware using Tesla Diagnostic Tool.
-
Use Toolbox to update or redeploy the firmware:
- If the vehicle is not running the latest firmware, run the "Vehicle Firmware Update" procedure.
- If the vehicle is running the latest firmware, run the "Firmware Redeploy" procedure.
- If possible, charge the vehicle at above 40 A for several minutes and verify that there are no alerts.
READ NEXT:
 Master Charger - RH - 2nd Generation (Remove and Replace) - Removal
Note: This procedure describes how to remove and install
the 2nd generation master charger. If the vehicle is equipped with a
1st generation master charger, refer to procedure 44100202 (refer
Installation, Configuration, and Coolant Purge
Fully clean the area before installing the new charger.
Note: Have an assistant hold up the front of the HVJB
20-30 mm until the coolant hoses have been secured to the
charger.
SEE MORE:
Striker - Door - Rear - LH (Remove and Replace)
Removal
Open door.
Remove countersunk screws (x2) securing striker plate to rear
door (torque 22 Nm).
Note: Note installed position of components before
removal.
Remove door striker.
Camera - Forward Facing (Remove and Replace)
Warning: If the 12V power supply is disconnected, do
not attempt to open any doors with door glass in closed position.
Failure to follow this instruction could result in door glass
shatter.
Note: Before disconnecting the 12V power supply,
ensure that the driver's door wi
