Tesla Model S: HV Junction Box - Cover - 1st Generation (Remove and Replace)
Tesla Model S (2012-2026) Service Manual / High Voltage System / HV Junction Box - Cover - 1st Generation (Remove and Replace)
Warning: Only technicians who have been trained in High Voltage Awareness are permitted to perform this procedure. Proper personal protective equipment (PPE) and insulating HV gloves with a minimum rating of class 00 (500V) must be worn any time a high voltage cable is handled. Refer to Tech Note TN-15-92-003, "High Voltage Awareness Care Points" for additional safety information.
Removal
- Disconnect 12V and HV power:
- Rear wheel drive (RWD): Refer to procedure.
- Dual Motor: Refer to procedure.
- Remove the 2nd row cushion frame (refer to procedure).
Warning: Ensure that the multimeter and leads are capable of handling at least 500V.
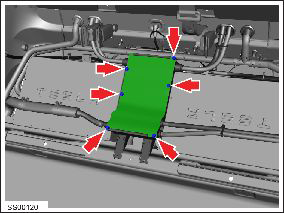
- Remove the bolts (x6) that secure the HV junction box cover
(torque 5 Nm). Remove the cover.
- Use a multimeter to check voltages across the HV cables and to
ground:
- B+ to ground
- B- to ground
- B+ to B-
Warning: If any voltage reading is more than 10V, the high
voltage contactors are not fully opened. Due to the risk of
electrocution, contact Service Engineering before performing
any further work.

1 B+ 2 Ground 3 B-
Installation procedure is the reverse of removal.
READ NEXT:
 HV Junction Box - 2nd Generation (Remove and Replace)
Warning: Only technicians who have been trained in High
Voltage Awareness are permitted to perform this procedure. Proper
personal protective equipment (PPE) and insulating HV gloves with a
HV Junction Box - Cover - 2nd Generation (Remove and Replace) - Removal
Warning: Only technicians who have been trained in High
Voltage Awareness are permitted to perform this procedure. Proper
personal protective equipment (PPE) and insulating HV gloves with a
SEE MORE:
Brake Pads - Park Brake - Burnishing
Warning: Be sure to comply
with all local traffic safety laws and only perform such maneuvers in a
suitable location such as a nonresidential side street with little to no
traffic.
Caution: Do not perform this
procedure on a vehicle that has new rotors unless they have gone through
a
Seat Belt Warnings
WARNING: Seat belts should be worn by all
occupants at all times, even if driving for a very
short distance. Failure to do so increases the risk
of injury or death if a collision occurs.
WARNING: Secure small children in a suitable child
safety seat as described in the Child Safety Seat
© 2019-2026 Copyright www.tesms.org
