Tesla Model S: Lamp - Fog - Front - LH (Remove and Replace)
Tesla Model S (2012-2026) Service Manual / Electrical / Lamp - Fog - Front - LH (Remove and Replace)
Removal
- Remove the front fascia (refer to procedure).
- Release the clips (x4) that secure the fascia harness to the fog lamp assembly.
- Disconnect the fog lamp harness connector.
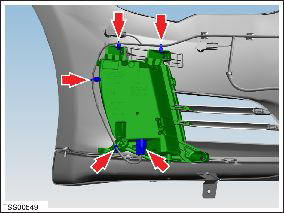
- Remove the screws (x3) and bolt that secure the fog lamp
assembly to the fascia.
.png)
- Remove the fog lamp assembly.
Installation procedure is the reverse of removal, except for the following:
- In the vehicle's configuration in Toolbox, set the "Front Fog" option to "Yes".
- Adjust the aim of the fog lamp as necessary (refer to procedure).
READ NEXT:
 Horn - 1st Generation (Remove and Replace)
Removal
Remove the front underhood apron (refer to procedure).
Remove the bolt that secures the horn to the bracket (torque 8
Nm).
Horn - 2nd Generation (Remove and Replace)
Removal
Remove the active center louver assembly (refer to procedure).
Place the active center louver assembly on a soft, clean surface
with the front of the duct assembly facing
Wiper Motor Assembly (Remove and Replace)
Removal
Ensure that the wipers are in the off position by rotating the
end of the left-hand steering column lever toward you.
Open the hood to the service position.
Remove the cow
SEE MORE:
Rear Reading Lights
Model S is equipped with a reading light on each side of
the rear seats, located above the door and next to the
coat hangers (see Coat Hangers ). To turn a
reading light on or off, press its lens. If you leave a
reading light turned on, it automatically turns off when
Model S powers off.
Headli
Stop Signs and Road Markings
When driving with Autosteer or Traffic-aware Cruise Control engaged, and
Traffic Light and Stop Sign Control
enabled, Model S is designed to respond as follows when approaching
intersections controlled by stop signs, stop
lines, or road markings:
No Traffic Control
Arm of T-junction
M
© 2019-2026 Copyright www.tesms.org
