Tesla Model S: Lamps - Fog - Front - Adjust
Tesla Model S (2012-2026) Service Manual / Electrical / Lamps - Fog - Front - Adjust
- Position the vehicle for adjusting the fog lamps:
- In a darkened area.
- On a level surface.
- Perpendicular to a wall that has a matte white surface. The wall must be at least 3.7 m (12 ft) wide and 1.87 m (6 ft) high.
- The fog lamps are 10 m (32.8 ft) away from the wall.
- Ensure that all 4 tires are inflated to their recomended settings. Refer to General Information > Technical Data > Tire pressures.
- If the vehicle is equipped with air suspension, set the suspension height to "High", then to "Standard".
- Ensure that the vehicle is level by rocking it from side to side.
- Record the height between the ground and the center of the projector
lenses on the LH and RH fog lamps.
- Measure a straight line between each of the projector lenses and the
wall. At the point where each line meets the wall, mark a horizontal line
100 mm (for ECE lamps) or 130 mm (for SAE lamps) lower than what was
recorded in the previous step. For example, if the height of the projector
lenses on a vehicle with SAE lamps is 283 mm, mark a horizontal line 153 mm
from the ground.
Model S shown; Model X similar
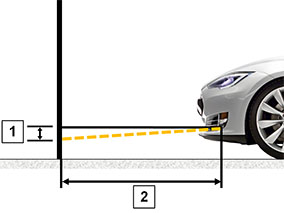
1 100 mm (3.94 in) (ECE lamps) 130 mm (5.12 in) (SAE lamps) 2 10 m (32.8 ft) - Turn on the fog lamps.
- Cover both headlights and the RH fog lamp.
- Insert an 8 mm socket wrench in the hole in the lower valance below the LH foglamp.
- Use the socket wrench to adjust the fog lamp vertically so that the top
beam cut off is aligned with the horizontal line marked on the wall.
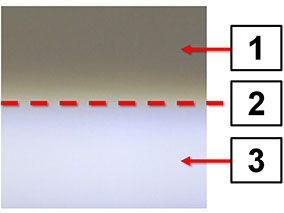
1 Dark area of the wall 2 Horizontal line marked on the wall 3 Illuminated area of the wall - Repeat steps 8-10 to adjust the RH fog lamp.
READ NEXT:
 Lamp - Fog - Front - LH (Remove and Replace)
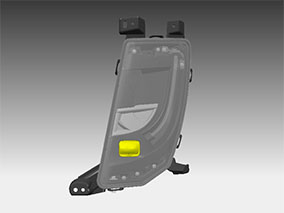
Removal
Remove the front fascia (refer to procedure).
Release the clips (x4) that secure the fascia harness to the fog
lamp assembly.
Disconnect the fog lamp harness connector.
Horn - 1st Generation (Remove and Replace)
Removal
Remove the front underhood apron (refer to procedure).
Remove the bolt that secures the horn to the bracket (torque 8
Nm).
Horn - 2nd Generation (Remove and Replace)
Removal
Remove the active center louver assembly (refer to procedure).
Place the active center louver assembly on a soft, clean surface
with the front of the duct assembly facing
SEE MORE:
General Precautions
The supplementary restraint system (SRS) includes air bags, pre-tensioners,
and other safety-related components. The SRS contains components which
could be potentially hazardous to the technician if not serviced and
handled correctly.
Warning: Always follow these precautions and the relev
Speaker - Rear Door All, Front Door Base Audio (Remove and Replace)
Removal
Remove rear door trim panel (refer to procedure)
Disconnect speaker harness connector.
Note: Components have been removed in this graphic
to aid clarity.
Remove screws (x4) securing speaker to rear door (torque 1.8
Nm).
© 2019-2026 Copyright www.tesms.org
