Tesla Model S: Striker - Door - Rear - LH (Remove and Replace)
Tesla Model S (2012-2026) Service Manual / Closures / Striker - Door - Rear - LH (Remove and Replace)
Removal
- Open door.
- Remove countersunk screws (x2) securing striker plate to rear
door (torque 22 Nm).
Note: Note installed position of components before removal.
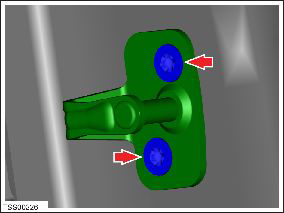
- Remove door striker.
Installation procedure is the reverse of removal.
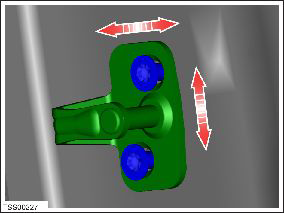
Adjust
Check and adjust door to body as required.
READ NEXT:
 Handle - Interior Release - Door - Front - LH (Remove and Replace)
Removal
Remove front door trim panel (refer to procedure)
Release clips and remove door pad finisher.
Caution: Take care not to damage component(s).
Handle - Interior Release - Door - Rear - LH (Remove and Replace)
Removal
Remove the rear door trim panel (refer to procedure).
Remove the screws (x3) and the nut (x1) that secure the interior
door handle to the trim pad (torque 3 Nm).
Handle - Exterior Release - Door - Front - LH (Remove and Replace)
Removal
Remove regulator assembly (refer to procedure)
Make sure exterior release handle is fully retracted.
Disconnect handle harness connector.
Remove nuts (x4) securing door re
SEE MORE:
Importing Contacts and Recent
Calls
Once paired, use the Bluetooth settings screen to
specify whether you want to allow access to your
phone's calendar, contacts and recent calls. If you allow
access, you can use the phone app to make calls and
send messages to people in your list of contacts and on
your recent calls list (see Bl
Replacing Cabin Air Filters
Model S has an air filter that prevents pollen, industrial
fallout, road dust, and other particles from entering the
cabin through the vents. Tesla recommends replacing
these filters every 2 years (every year in China). Cabin
filters can be purchased at the Tesla online store.
To replace the ca
© 2019-2026 Copyright www.tesms.org
