Tesla Model S: Panel - Door Trim - LH - Rear (Remove and Install)
Tesla Model S (2012-2026) Service Manual / Interior trim / Panel - Door Trim - LH - Rear (Remove and Install)
Removal
- Position the vehicle so that there is full access to the door.
- Open the door for access.
- Release the screw cover from the door trim panel. Caution: Take care not to damage component(s).
- Remove the screws (x3) that secure the trim pad to the door. Note that two screws are concealed by the door handle cover (torque 3 Nm) and one screw is concealed by the pull cup's rubber insert (torque 6 Nm).
- Using a trim tool, remove and discard the heart flex clips (x8)
that secure the trim.
Caution: Take care not to damage component(s).

- Support the door trim and disconnect the puddle lamp connector.
- Disconnect the door switch harness connector.
- Disconnect the door pocket lamp harness connector.
- Disconnect the harness connector from the rear safety lamp.
- Disconnect the latch release switch connector from the inner
door handle.
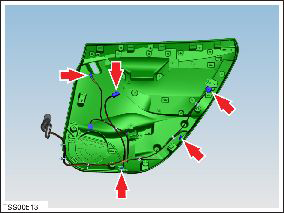
- Remove the door trim from vehicle.
Installation procedure is the reverse of removal, except for the following:
- Replace all heart flex clips (x8) that secure the trim panel.
READ NEXT:
 Panel - Door Trim - LH - Rear (Remove and Replace)
Removal
Remove the rear window lift switch (refer to procedure).
Release the clips (x4) that secure the speaker cover to the door
trim.
Caution: Take care not to damage co
Trim - Sill Panel - LH (Remove and Replace)
Removal
Remove the LH middle 'A' pillar trim panel (refer to procedure).
Use a trim tool to release the 2nd clip from the rear.
Caution: To avoid damaging the sill panel,
Trim - 'A' Post - LH (Remove and Install)
Removal
Remove the A-Pillar middle trim panels (refer to procedure)
Release 'A' post trim retaining screw cover, lower edge first.
Remove screw (x1) securing trim to 'A' post
SEE MORE:
Premium Boost Amplifier (Remove and Replace)
Removal
Release latch, disconnect amplifier harness connector and
position aside.
Caution: Take care not to damage component(s).
Remove AM/FM tuner module (refer to procedure)
Remove screws (x4) sec
Trim - Touch Screen Surround (Remove and Replace)
Removal
Remove the MCU/touch screen (refer to procedure).
Remove the screws (x6) that secure the touch screen surround
(torque 4 Nm).
Cut the cable tie that secures the Bluetooth antenna to the edge
clip on the bezel.
Remove the bezel from the MCU.
Remove the screws
© 2019-2026 Copyright www.tesms.org
