Tesla Model S: Motor - Seat Tilt - Driver's Seat (Remove and Replace)
Tesla Model S (2012-2026) Service Manual / Seats / Motor - Seat Tilt - Driver's Seat (Remove and Replace)
Removal
- Remove the driver's seat (refer to procedure).
- Place the seat on a clean work surface.
- Remove the screw that secures the inner side cover to the seat
(torque 1 Nm).
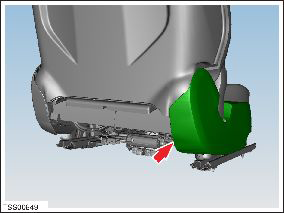
- Carefully release the inner side cover from the retaining bracket.
- Release the clip that secures the seat harness to the cover.
- Remove the inner side cover.
- Disconnect the seat tilt motor connector and harness.
- Remove the outboard nuts (x3) that secure the seat tilt motor to
the seat (torque 8 Nm).
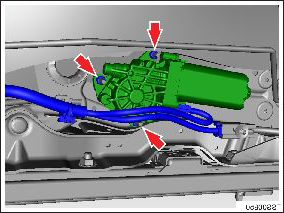
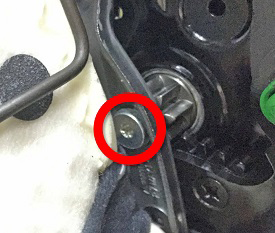
- Remove the inboard screw that secures the seat tilt motor to the
seat frame (torque 12 Nm).
- Remove the seat tilt motor.
READ NEXT:
 Motor - Seat Height - Driver's Seat (Remove and Replace)
Removal
Power the seat fully upward, away from the floor.
Remove the driver's seat outer side cover (refer to procedure).
Disconnect the seat height motor connector and harness.
Switch - Seat Height Adjust - Driver's Seat (Remove and Replace)
Removal
Remove driver seat outer side cover (refer to procedure)
Remove screws (x3) securing lumbar adjust switch to cover
(torque 1 Nm).
Switch - Back Rest and Cushion Adjust - Driver's Seat (Remove and Replace)
Removal
Remove driver seat outer side cover (refer to procedure)
Remove screws (x4) securing back rest and cushion adjust switch
to cover (torque 1 Nm).
SEE MORE:
Mobile Connector to adapter connection hot
Maximum charge rate reduced
Charge current has been reduced because the Mobile Connector has detected a
high temperature at the connection
between the wall plug adapter and the control box.
Make sure the wall plug adapter is fully connected to the Mobile Connector
control box.
After unplugging
Assembly - Closeout Extension - LH - Center Console (Remove and Replace)
Removal
Remove LH wrapped panel trim (refer to procedure)
Remove mat from footwell.
Release clips (x8) and adhesive pad (x1) securing closeout
extension to console.
Caution: Take care not to damage component(s).
Caution: Replace any broken clips.
© 2019-2026 Copyright www.tesms.org
