Tesla Model S: Motor - Seat Height - Driver's Seat (Remove and Replace)
Tesla Model S (2012-2026) Service Manual / Seats / Motor - Seat Height - Driver's Seat (Remove and Replace)
Removal
- Power the seat fully upward, away from the floor.
- Remove the driver's seat outer side cover (refer to procedure).
- Disconnect the seat height motor connector and harness.
- Remove the outboard nuts (x3) that secure the seat height motor
to the seat (torque 8 Nm).
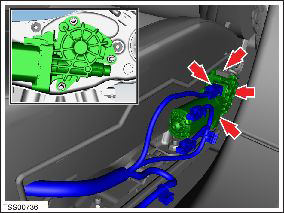
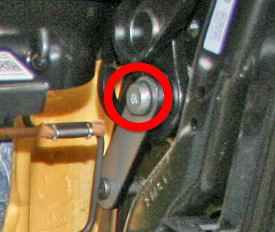
- Remove the inboard screw that secures the seat height motor to
the seat frame (torque 12 Nm).
- Remove the seat height motor.
Assembly - Lumbar Support - Back Rest - Driver's Seat (Remove and Replace)
Removal Note: The lumbar support assembly is not serviceable separately. Remove seat back rest assembly (refer to procedure) Installation Installation procedure is the reverse of removal.Motor - Recliner - Back Rest - Driver Seat (Remove and Replace)
Removal Note: The recliner motor is not serviceable separately. Remove seat back rest assembly (refer to procedure) Installation Installation procedure is the reverse of removal.READ NEXT:
 Switch - Seat Height Adjust - Driver's Seat (Remove and Replace)
Removal
Remove driver seat outer side cover (refer to procedure)
Remove screws (x3) securing lumbar adjust switch to cover
(torque 1 Nm).
Switch - Back Rest and Cushion Adjust - Driver's Seat (Remove and Replace)
Removal
Remove driver seat outer side cover (refer to procedure)
Remove screws (x4) securing back rest and cushion adjust switch
to cover (torque 1 Nm).
Seat Assembly - Driver's (Remove and Install)
Removal
Note the customer's seating profile.
Position the vehicle to provide good access to the driver's
seat.
Power the seat fully rearward for access.
Release the clips (x4)
SEE MORE:
Camera Location
Model S is equipped with a rear view camera located
above the rear license plate.
Whenever you shift into Reverse, the touchscreen
displays the view from the camera. Lines show your
driving path based on the position of the steering yoke.
These lines adjust as you move the steering yoke.
Model
Air Suspension - Pressurize - Full System
Add Nitrogen to the Air Reservoir System
Warning: Wear eye protection while performing this
procedure.
Caution: Tesla recommends using a nitrogen refill kit to
refill the air suspension reservoir. Do not use shop air, which
might contain contaminants that could damage the
© 2019-2026 Copyright www.tesms.org
