Tesla Model S: Reservoir Assembly - Coolant (Dual Motor) (Remove and Replace)
Tesla Model S (2012-2026) Service Manual / Thermal Management / Reservoir Assembly - Coolant (Dual Motor) (Remove and Replace)
Warning: If the 12V power supply is disconnected, do not attempt to open any doors with door glass in closed position. Failure to follow this instruction could result in door glass shatter.
Note: Before disconnecting the 12V power supply, ensure that the driver's door window is fully open. Failure to follow this instruction could result in vehicle lockout.
Removal
- Disconnect 12V power (refer to procedure).
- Place a coolant catcher underneath the vehicle directly below the coolant reservoir.
- Remove the reservoir cap.
- Siphon the coolant from the reservoir into a container.
- Disconnect the coolant level sensor harness.
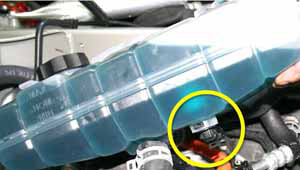
- Remove the bolt that secures the coolant hose retaining ring to
the battery support brace (torque 5 Nm).
.png)
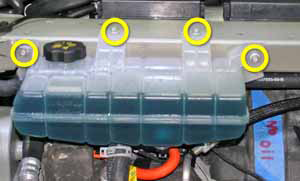
- Release the bolts (x4) that secure the coolant reservoir to the
front crossmember (torque 6 Nm).
- Clamp the coolant hoses (x2).
- Place absorbent material under the coolant hoses and reservoir.
- Release the locking rings (x2) that secure the coolant hoses to the coolant reservoir.
- Remove the reservoir from the vehicle.
- Clean up any spilled coolant.
Installation procedure is the reverse of removal, except for the following:
- When all components have been reinstalled, refill and bleed the cooling system (refer to procedure).
READ NEXT:
 Reservoir Cap - Coolant (Remove and Replace)
Removal
Remove the rear underhood apron (refer to procedure).
Remove the cap from the reservoir.
Installation
Ins
3 Way Coolant Valve - Chiller Bypass (Remove and Replace)
Warning: If the vehicle has air suspension, activate "Jack"
mode on the touchscreen before raising and supporting the vehicle.
Warning: If the 12V power supply is disconnected, do
not att
3 Way Coolant Valve - Radiator Bypass (Remove and Replace)
Warning: If the 12V power supply is disconnected, do
not attempt to open any doors with door glass in closed position.
Failure to follow this instruction could result in door glass
shat
SEE MORE:
Cover - Back Rest - Driver's Seat (Install)
Installation
Install new fir tree clips (x4) into the new seat back:
Position the fir tree clip into the bracket.
Use a pair of pl
Braking Systems
WARNING: Properly functioning braking systems
are critical to ensure safety. If you experience a
problem with the brake pedal, brake calipers, or
any component of a Model S braking system,
contact Tesla immediately.
Model S has an anti-lock braking system (ABS) that
prevents the wheels f
© 2019-2026 Copyright www.tesms.org
