Tesla Model S: Camera - Forward Facing (Remove and Replace)
Warning: If the 12V power supply is disconnected, do not attempt to open any doors with door glass in closed position. Failure to follow this instruction could result in door glass shatter.
Note: Before disconnecting the 12V power supply, ensure that the driver's door window is fully open. Failure to follow this instruction could result in vehicle lockout.
Removal
Caution: Do not touch the camera lens at any point during this procedure.
- Disconnect 12V power.
- Rear wheel drive (RWD): Refer to procedure.
- Dual Motor: Refer to procedure.
- Remove the rear view mirror (refer to procedure).
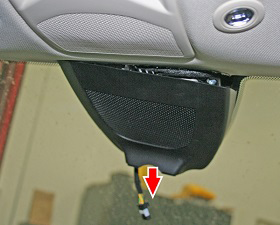
- Remove the rear cover by pulling down to release the clips (x4).
Caution: Do not damage the headliner when removing the rear cover.
Caution: Replace any broken clips.
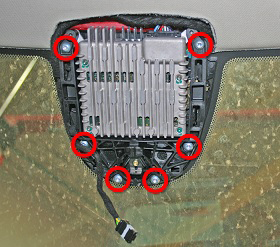
- Release the screws (x6) that secure the camera bracket (torque
3.5 Nm).
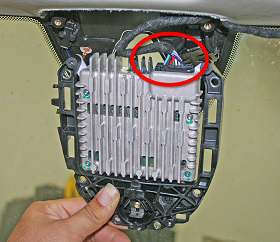
- Move the rear view mirror harness out of the way.
- Disconnect the camera harness connector.
- Remove the camera assembly.
Installation procedure is the reverse of removal, except for the following:
Caution: Do not touch the camera lens at any point during this procedure.
- Clean the inside surface of the windshield with glass cleaner and ensure it is fully dry before installing the forward facing camera.
- Calibrate the forward facing camera (refer to procedure).
READ NEXT:
 Camera - Rear Facing (Remove and Replace)
Removal
Remove the tailgate lower finisher (refer to procedure).
Pull back the watershield for access to the rear camera
electrical connector.
Drive Cycle Calibration - Forward Facing Camera
Note: If available, calibrate the forward facing camera using
the Camera Calibration Target (refer to procedure).
Note: This procedure describes how to perform a drive cycle
calibration on the
Target Calibration - Forward Facing Camera
Special tool required for this procedure:
Supplier
Part Number
Description
Tesla
SEE MORE:
Strut - Liftgate (Remove and Replace)
Removal
Open liftgate.
Support liftgate in open position.
Release clip securing gas strut to body.
Disconnect gas strut from ball joint.
Release clip securing gas strut to liftgate.
Disconnect and remove gas
Latch - Liftgate (Remove and Replace)
Removal
Open liftgate and secure at working height.
Remove liftgate trim (refer to procedure)
Disconnect wiring harness connector.
Remove screws (x2) securing liftgate latch assembly (torque 10
Nm).
Release
