Tesla Model S: Seat Assembly - 3rd Row (Replace)
Tesla Model S (2012-2026) Service Manual / Seats / Seat Assembly - 3rd Row (Remove and Replace) / Seat Assembly - 3rd Row (Replace)
Installation
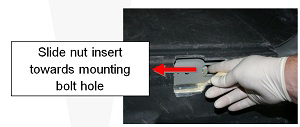
Installation procedure is the reverse of removal, except for the following:- Before installing the mounting bolts, ensure that the
mounting bracket holes are aligned with the threaded nut inserts
behind the body panel. If the nut insert does not align with the
bolt hole:
- Remove the rear sill trim panel (refer to procedure).
- Slide the nut insert into position.
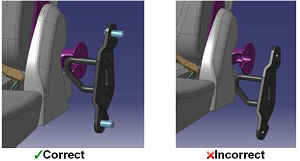
- Verify that the third row seat has full range of motion and
latches properly:
- Ensure that the side latches are engaging correctly into
the LH and RH strikers. If the latches are aligned too high,
the trunk floor carpet is keeping the seat from sitting in
the proper position. Kneel on both sides of the seat
cushion, using your body weight to compress the seat and
carpet. The carpet should stay compressed, keeping the hooks
in proper alignment permanently.
- Ensure that the upper latch on the 3rd row seat click
smoothly into place and is securely fastened to the 2nd row
seatback.
- Remove the 3 screws on the back of the latch trim
cover.
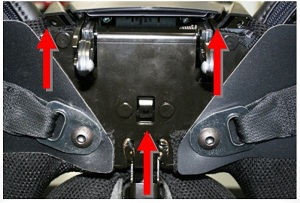
- Lift the handle cover. Remove the latch trim cover
to expose the 4 retaining nuts.
- Loosen the 4 nuts slightly, so that the latch
assembly is free to move up and down for adjustment.
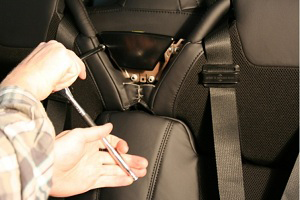
- With the 3rd row seatback latched to the 2nd row
seat, center the latch position free play. The latch
assembly will self-align to the 2nd row seat striker.
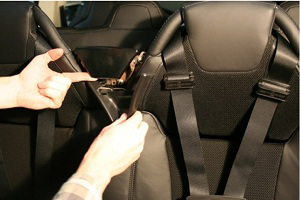
- Tighten the 4 latch nuts (torque 5 Nm).
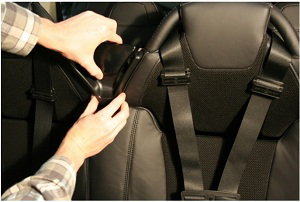
- Unlatch the 3rd row seat. Reinstall the latch surround trim piece and secure it with the 3 screws (torque 0.5 Nm).
- Verify proper latching of the 3rd row seat to the 2nd row seat back for smooth engaging and release.
- Remove the 3 screws on the back of the latch trim
cover.
- Ensure that the side latches are engaging correctly into
the LH and RH strikers. If the latches are aligned too high,
the trunk floor carpet is keeping the seat from sitting in
the proper position. Kneel on both sides of the seat
cushion, using your body weight to compress the seat and
carpet. The carpet should stay compressed, keeping the hooks
in proper alignment permanently.
READ NEXT:
 Cover - Outer Side - Driver's Seat (Remove and Install)
Removal
Open both driver's side doors.
Power the seat height adjust fully upwards for access.
Remove the screw that secures the outer side cover to the seat
(torque 1 Nm).
Cover - Back Rest - Driver's Seat (Remove)
Removal
Prepare a padded work area
Remove the driver's seat assembly (refer to procedure). With an
assistant, place the seat onto a padded work area so that the
plastic seat back
SEE MORE:
Speaker - Rear Door All, Front Door Base Audio (Remove and Replace)
Removal
Remove rear door trim panel (refer to procedure)
Disconnect speaker harness connector.
Note: Components have been removed in this graphic
to aid clarity.
Remove screws (x4) securing speaker to rear door (torque 1.8
Nm).
Headlight Assembly - LH (Remove and Replace)
Removal
Remove front fascia for access (refer to procedure)
Disconnect headlight connectors (x2).
Remove bolts (x4) securing headlight to carrier and fender
(torque 4 Nm).
Note: LH wheel arch lin
© 2019-2026 Copyright www.tesms.org
