Tesla Model S: Sensor - Impact - Front (Remove and Replace)
Tesla Model S (2012-2026) Service Manual / Safety and Restraint / Sensor - Impact - Front (Remove and Replace)
Warning: To avoid personal injury, observe all relevant safety precautions before removing or testing any SRS components.
Removal
- Remove the underhood storage unit:
- Rear wheel drive (RWD): Refer to procedure.
- Dual Motor: Refer to procedure.
- Disconnect the front impact sensor connector.
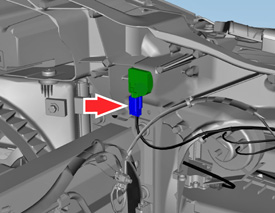
- Loosen the screw that secures the impact sensor to the front
carrier (torque 6 Nm).
Caution: The screw is left-hand threaded / reverse threaded. However, when the screw is being loosened from the tip (as opposed to the head), it functions the same as a normal screw.
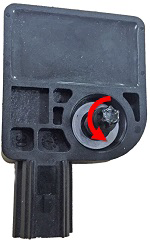
- Remove the front impact sensor.
Installation procedure is the reverse of removal.
READ NEXT:
 Sensor - Impact - B Pillar (Remove and Replace)
Removal
Remove the B-pillar lower trim (refer to procedure).
Disconnect the impact sensor harness connector.
Remove the bolt that secures the impact sensor to the B-pillar
(torque
Sensor - Impact - C Pillar (Remove and Replace)
Removal
Remove sill panel trim (refer to procedure)
Pull up lower portion of the 'C' post lower trim panel by
releasing the trim clips.
Caution: Take care not to damage co
Sensor - Occupant Classification - Front Passenger's Seat - Calibration
Note: The OCS is not installed in all markets and is
currently only present in North America. This OCS re-zero
calibration procedure is for North America.
OCS Re-Zero Calibration
En
SEE MORE:
Drive Unit - Rear - Large (Remove and Install)
Special tools required for this procedure:
Supplier
Part Number
Description
Tesla
1000991
Axle Extractor
Note: Use 1000991 for a large drive unit only.
Scheduled Charging and Scheduled
Departure
Toggle between Scheduled Departure and Scheduled
Charging by touching Controls > Charging > Switch to
Scheduled Charging/Scheduled Departure when
Model S is in Park.
NOTE: Scheduled Charging/Scheduled Departure
settings are also available on the Climate Controls
screen and in the Tesla mo
© 2019-2026 Copyright www.tesms.org
