Tesla Model S: Vertical Alignment
Special tools required for this procedure:
| Supplier | Part Number | Description |
| Tesla | 1056984-00-A | Radar Calibration Bubble Level - Cross Test |
| Tesla | 1056723-00-A | T-Handle Nut Driver 3.5 MM |
Note: Components have been removed in this graphic to aid clarity.
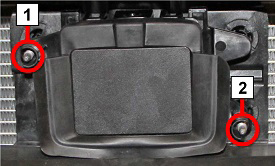
| 1 | Horizontal alignment screw |
| 2 | Vertical alignment screw |
- Inspect the bubble tool for damage. Caution: Do not perform this procedure with a damaged bubble tool.
- Perform a four wheel alignment (refer to procedure). Note: The four wheel alignment is not included in the front radar sensor calibration correction code. Add the four wheel alignment correction code separately. Caution: The vehicle must be level when performing the vertical alignment procedure. Do not remove the vehicle from the alignment rack.
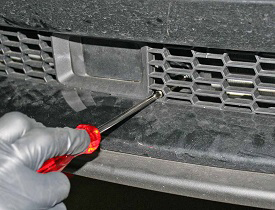
- Clean the front of the radar sensor with water and a clean shop towel.
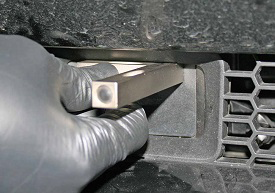
- Use the bubble tool to adjust the vertical alignment of the
radar sensor:
- Gently support the bubble tool flat against the face of the
radar sensor so that it is flush with the top, center portion of
the gasket.
Caution: Do not apply excessive pressure to the bubble tool; the radar sensor might become misaligned.
Note: The radar sensor has a convex shape; ensure that the bubble tool is centered on the highest part of the radar sensor.
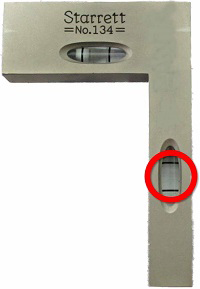
- Check the bubble on the long portion of the bubble tool. The
radar sensor is calibrated vertically if the bubble is centered
between the black lines.
Caution: The bubble must be centered between the 2 black lines to achieve the required calibration.
Tip: It might be easier to see the bubble with a flashlight.
- If necessary, adjust the vertical set screw.
- Perform steps b and c as necessary until the radar sensor is calibrated vertically.
Caution: Remove the hex driver from the vertical set screw while measuring with the bubble tool to avoid misaligning the radar sensor.
- Gently support the bubble tool flat against the face of the
radar sensor so that it is flush with the top, center portion of
the gasket.
- Remove the vehicle from the alignment rack.
- Perform the "Horizontal Alignment" procedure.
READ NEXT:
 Horizontal Alignment
Note: Perform the "Vertical Alignment" procedure
before performing the "Horizontal Alignment" procedure.
Connect a laptop with Toolbox 2.0 or later to the vehicle.
Perform the Radar
Casing - Transmitter - Remote Keyless Entry (RKE)
Caution: Perform this procedure while using the proper anti-electrostatic
discharge equipment. Refer to TN-14-92-003, "Electrostatic Discharge
Tooling".
Removal
Remove the transm
Transmitter - Remote Keyless Entry (RKE) - Programming
Key LearnCaution: Before beginning this procedure, it is necessary to
have all keys present. Any keys that are not present will deactivate
after completing the procedure.
Sit in the d
SEE MORE:
Charge Port - Single Phase - Non-Motorized (Remove and Replace) -
Installation
Installation
Installation procedure is the reverse of removal, except
for the following:
If the charge port has alignment pins, use wire-cutting pliers
or a similar tool to trim them flush.
Pipe - High Pressure - Compressor to Condenser (Dual Motor) (Remove and
Replace)
Removal
Position the vehicle on a lift, but do not raise it at this
time.
Recover refrigerant from the vehicle (refer to procedure).
Remove the 12V battery (refer to procedure).
Remove the bolt that secures the high pressure pipe to the
compressor (torque 10 Nm).
