Tesla Model S: Shaft - Steering Column - Intermediate Lower (Remove and Replace)
Tesla Model S (2012-2026) Service Manual / Steering / Shaft - Steering Column - Intermediate Lower (Remove and Replace)
Removal
- Remove the underhood storage unit for access (refer to procedure).
- Mark the lower intermediate shaft position relative to the upper intermediate shaft and pinion.
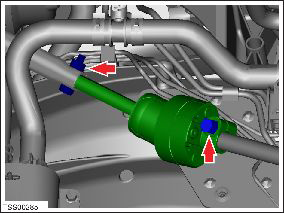
- Remove the bolt that secures the lower intermediate shaft to the steering rack (torque 49 Nm).
- Remove the nut and bolt that secure the lower intermediate shaft
to the upper intermediate shaft (torque 50 Nm).
- Release the lower intermediate shaft from the slot in the upper intermediate shaft.
- Release the lower intermediate shaft from the rack. Remove the lower intermediate shaft.
Installation procedure is the reverse of removal, except for the following:
Note: Clean the affected areas before installation.
- Ensure that the lower intermediate shaft to pinion marks align correctly.
- Run the "Power Steering (EPAS) Control" procedure in Toolbox.
READ NEXT:
 Shaft - Steering Column - Intermediate Lower (Dual Motor) (Remove and
Replace)
Shaft - Steering Column - Intermediate Lower (Dual Motor) (Remove and
Replace)
Warning: If the 12V power supply is disconnected, do
not attempt to open any doors with door glass in closed
position. Failure to follow this instruction could result in
door glass shat
Shaft - Steering Column - Intermediate Upper (Remove and Replace)
Removal
Remove the driver's side footwell cover (refer to procedure).
Disconnect the lower intermediate shaft (refer to procedure).
Disconnect the lower intermediate shaft fro
Shaft - Steering Column - Intermediate Upper (Dual Motor) (Remove and
Replace)
Warning: If the 12V power supply is disconnected, do
not attempt to open any doors with door glass in closed
position. Failure to follow this instruction could result in
door glass shat
SEE MORE:
Vacuum Brake Booster Assembly (Remove and Replace)
Caution: This procedure
describes how to remove and replace the vacuum brake booster
only. If the vehicle is equipped with an electromechanical brake
booster assembly, refer to procedure 33031402
(refer to procedure).
Removal
Remove the master cylinder and r
Chin Spoiler Assembly (Remove and Replace)
Warning: If the vehicle has air suspension, activate "Jack"
mode on the touchscreen before raising and supporting the vehicle.
Removal
Remove the front fascia refer to procedure.
Remove the ankle catcher foam, if equipped.
© 2019-2026 Copyright www.tesms.org
