Tesla Model S: Shaft - Steering Column - Intermediate Upper (Remove and Replace)
Tesla Model S (2012-2026) Service Manual / Steering / Shaft - Steering Column - Intermediate Upper (Remove and Replace)
Removal
- Remove the driver's side footwell cover (refer to procedure).
- Disconnect the lower intermediate shaft (refer to procedure).
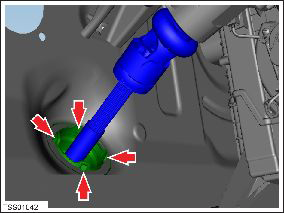
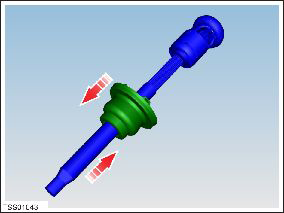
- Disconnect the lower intermediate shaft from the slot in the upper intermediate shaft.
- Release the upper intermediate shaft from the column shaft.
- Release the clips (x4) that secure the steering shaft seal to
the bulkhead.
- Remove the upper intermediate shaft.
Installation procedure is the reverse of removal, except for the following:
Caution: Replace all nylon-insert locknuts.
- Ensure that the upper intermediate shaft to column marks align correctly.
- Run the "Power Steering (EPAS) Control" procedure in Toolbox.
READ NEXT:
 Shaft - Steering Column - Intermediate Upper (Dual Motor) (Remove and
Replace)
Shaft - Steering Column - Intermediate Upper (Dual Motor) (Remove and
Replace)
Warning: If the 12V power supply is disconnected, do
not attempt to open any doors with door glass in closed
position. Failure to follow this instruction could result in
door glass shat
Steering Wheel (Remove and Replace)
Removal
Remove the driver's air bag (refer to procedure).
Position the wheels straight ahead. Mark the steering wheel
relative position to the column.
Remove and discard the bolt
Steering Column (Remove and Replace)
Removal
Ensure that the front road wheels are in a straight ahead
position.
Remove the driver's side lower dash trim (refer to procedure).
Remove the steering controller modul
SEE MORE:
Pump - Windshield Washer Reservoir (Remove and Replace)
Removal
Remove the front LH upper wheel arch liner (refer to procedure).
Position a container to collect any spillage.
Disconnect the washer pump connector.
Release the washer tube from the pump and drain any fluid from
the reservoir.
Note: Place suitable abs
2nd Row Center Console Assembly (Remove and Replace)
Removal
Fold the RH 2nd row back rest.
Loosen the 2nd row center console tether strap behind the center
seat.
Unclip the tether latch from the child seat anchor.
Pull the tether out between the seat and the back re
© 2019-2026 Copyright www.tesms.org
