Tesla Model S: Speaker - Front Door Premium Audio - LH/RH (Remove and Replace)
Tesla Model S (2012-2026) Service Manual / Infotainment / Speaker - Front Door Premium Audio - LH/RH (Remove and Replace)
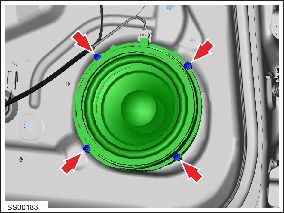
Removal
- Remove door trim panel (refer to procedure)
- Remove 4 screws securing speaker to spacer ring (torque 1.8 Nm).
- Remove connector from door speaker.
- Remove front door speaker.
- Remove 4 screws securing trim ring to door shell (torque 1.8
Nm).
Installation procedure is the reverse of removal.
Note: If reinstalling existing speaker and/or trim ring, inspect the seals on each. If seals are damaged, speaker/trim ring assembly must be replaced.
READ NEXT:
 Speaker - Rear Door All, Front Door Base Audio (Remove and Replace)
Removal
Remove rear door trim panel (refer to procedure)
Disconnect speaker harness connector.
Note: Components have been removed in this graphic
to aid cl
Subwoofer Assembly (Remove and Replace)
Removal
Remove RH side trunk trim (refer to procedure)
Remove screws (x3) securing subwoofer enclosure to body (torque
7 Nm).
Speaker - Rear - LH/RH (Remove and Replace)
Removal
Open tailgate to suitable working height.
Carefully release speaker cover clips (x9) from tailgate.
Caution: Take care not to damage component(s).
SEE MORE:
Bushing Removal, Front Motor Mount
Warning: To avoid personal injury, eye protection must
be worn when performing this operation.Warning: To avoid personal injury, safety-toe shoes and
cut-resistant gloves are recommended when performing this
operation.
Note: A demonstration video for removing and replac
Trim - 'C' Post Upper - LH (Remove and Replace)
Removal
Open LH rear door.
Fold rear seat back forward for access.
Using a suitable tool carefully release clips (x4) securing 'C'
post trim to body.
Caution: Take care not to damage component(s).
© 2019-2026 Copyright www.tesms.org
