Tesla Model S: Subwoofer Assembly (Remove and Replace)
Tesla Model S (2012-2026) Service Manual / Infotainment / Subwoofer Assembly (Remove and Replace)
Removal
- Remove RH side trunk trim (refer to procedure)
- Remove screws (x3) securing subwoofer enclosure to body (torque
7 Nm).
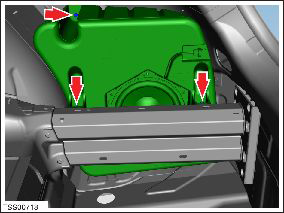
- Disconnect subwoofer harness connection.
- Remove subwoofer from vehicle.
Installation procedure is the reverse of removal.
Tweeter - 'A' Post - LH (Remove and Replace)
RemovalRemove 'A' post trim (refer to procedure)
Installation
Installation procedure is the reverse of removal.
READ NEXT:
 Speaker - Rear - LH/RH (Remove and Replace)
Removal
Open tailgate to suitable working height.
Carefully release speaker cover clips (x9) from tailgate.
Caution: Take care not to damage component(s).
Premium Boost Amplifier (Remove and Replace)
Removal
Release latch, disconnect amplifier harness connector and
position aside.
Caution: Take care not to damage component(s).
Tuner - AM - FM (Remove and Replace)
Note: This procedure applies to both base and premium
tuners (premium pictured).
Removal
Remove the driver side lower dash trim (refer to procedure).
Remove the driver si
SEE MORE:
Compressor - 2nd Generation (Remove and Replace)
Warning: Only technicians who have been trained in High
Voltage Awareness are permitted to perform this procedure. Proper
personal protective equipment (PPE) and insulating HV gloves with a
minimum rating of class 00 (500V) must be worn any time a high
voltage cable is handled. Refer
Filter - Particulate (Remove and Replace)
Removal
Remove the rear center underhood apron (refer to procedure).
Release the retainers (x2) that secure the particulate filter
cover.
Note: Components have been removed in this graphic
to aid clarity.
© 2019-2026 Copyright www.tesms.org
