Tesla Model S: Switch - Brake Light (Remove and Replace)
Tesla Model S (2012-2026) Service Manual / Instrument Panels and Pedals / Switch - Brake Light (Remove and Replace)
Removal
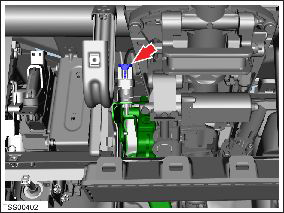
- Remove the driver's side lower dash trim (refer to procedure).
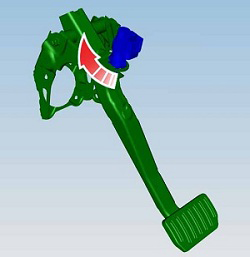
- Rotate the brake light switch 45 degrees clockwise and release
it from the brake pedal assembly.
Caution: The brake light switch is a one time use component. Ensure that a new switch is used during reinstallation.
Caution: Do not push or pull the brake pedal assembly while removing the brake light switch.
- Disconnect the brake light switch connector.
- Discard the brake light switch.
Caution: Ensure that the clevis pin is properly secured before reinstalling the brake switch.
- Position the brake light switch into the pedal. Rotate the
switch 45 degrees counter clockwise to secure it.
Caution: Do not push or pull the brake pedal assembly while installing the brake light switch.
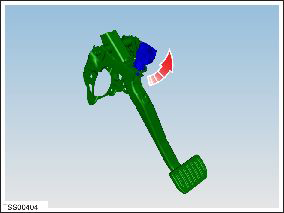
- Connect the brake light switch connector. Caution: The brake light switch is a one time use component. Ensure that a new switch is used during reinstallation.
- Press and release the brake pedal to turn on the drive rails.
- Verify the correct operation of the brake lights.
- Reinstall the components removed for access.
READ NEXT:
 Brake Pedal (Remove and Replace)
Removal
Remove the brake light switch (refer to procedure).
Caution: The brake light switch is a one time use
component. Ensure that a new switch is used durin
Accelerator Assembly (Remove and Replace)
Removal
Remove the driver's footwell cover:
Left-hand drive (LHD) vehicles: Refer to
procedure.
Right-hand drive (RHD) vehicles: Refer to
procedure.
Glove Box (Remove and Replace)
Removal
Remove the RH lower instrument panel (refer to procedure)
Remove the lower glove box panel by releasing the trim clips
(x6).
SEE MORE:
Switch - Window Lift - Front Passenger's (Remove and Replace)
Removal
Remove passenger door trim. Removal of passenger door trim is
similar to driver's door (refer to procedure)
Move acoustic pad aside to access door trim.
Caution: Take care not to damage component(s).
Jackshaft Assembly - Front (Remove and Replace)
Warning: If the vehicle has air suspension, activate "Jack"
mode on the touchscreen before raising and supporting the vehicle.
Removal
Remove the RH driveshaft assembly (refer to procedure).
Release the bolts (x2) that secure the jackshaft to the drive
unit (torque 30 Nm).
© 2019-2026 Copyright www.tesms.org
