Tesla Model S: Brake Pedal (Remove and Replace)
Tesla Model S (2012-2026) Service Manual / Instrument Panels and Pedals / Brake Pedal (Remove and Replace)
Removal
- Remove the brake light switch (refer to procedure). Caution: The brake light switch is a one time use component. Ensure that a new switch is used during reinstallation.
- Remove the spring clip from the clevis pin.
- Depress the brake pedal for clearance and remove the clevis pin.
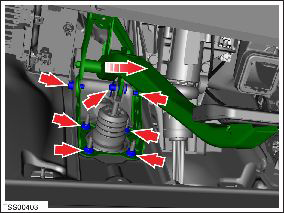
- Remove the nuts (x4) that secure the pedal to the brake booster assembly (torque 23 Nm).
- Remove the bolts (x2) that secure the brake pedal assembly to
the brake pedal reinforcement panel (torque 13 Nm). Remove the brake
pedal from the vehicle.
Installation procedure is the reverse of removal, except for the following:
Caution: Replace all nylon-insert locknuts.
Verify the correct operation of the brake lights.
READ NEXT:
 Accelerator Assembly (Remove and Replace)
Removal
Remove the driver's footwell cover:
Left-hand drive (LHD) vehicles: Refer to
procedure.
Right-hand drive (RHD) vehicles: Refer to
procedure.
Glove Box (Remove and Replace)
Removal
Remove the RH lower instrument panel (refer to procedure)
Remove the lower glove box panel by releasing the trim clips
(x6).
Glove Box - Latch Release (Remove and Replace)
Removal
Remove glove box assembly (refer to procedure)
Remove screws (x3) securing latch release module to glove box
assembly.
SEE MORE:
Gas Strut - Hood - LH (Remove and Replace)
Removal
Open hood.
Support hood in open position.
Release clip securing gas strut to body.
Disconnect gas strut from ball joint.
Release clip securing gas strut to hood.
Disconnect gas strut and remove from
Bash Plate - Front - Extrusion (Remove and Replace)
Removal
Raise and support the vehicle
(refer to procedure).
Remove and discard the bolts (x2) that secure
the bash plate extrusion to the front subframe (10 Nm).
Remove the bash plate extrusion.
Installation
© 2019-2026 Copyright www.tesms.org
