Tesla Model S: Tie Rod End - LH (Remove and Replace)
Tesla Model S (2012-2026) Service Manual / Steering / Tie Rod End - LH (Remove and Replace)
Warning: If the vehicle has air suspension, activate "Jack" mode on the touchscreen before raising and supporting the vehicle.
Removal
- Remove the road wheel (refer to procedure).
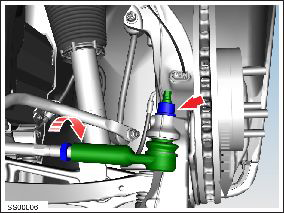
- Loosen the tie rod end jam nut (torque 70 Nm). Caution: To prevent tie rod damage, always restrain the tie rod with a wrench when loosening or tightening the jam nut.
- Restrain the tie rod ball-pin with a wrench and remove and
discard the nut that secures the tie rod end to the steering arm
(torque 103.5 Nm).
Caution: To prevent ball joint damage, always hold the ball joint pin with a wrench while loosening or tightening the lock nut.
- Release the tie rod end from the knuckle.
- Noting the number of turns required, unscrew the tie rod end.
Installation procedure is the reverse of removal, except for the following:
Warning: Only use cleaning agents and solvents in a well-ventilated area.
Caution: Replace all nylon-insert locknuts.
Note: Clean the affected areas before installation.
- Install the tie rod end using the exact number of turns noted during removal.
- Perform a four wheel alignment check (refer to procedure).
READ NEXT:
 Seal - Steering Rack (Remove and Replace)
Removal
Raise and support the vehicle (refer to procedure).
Warning: Do not work on an incorrectly supported
vehicle.
Remove upper intermediate stee
Shaft - Steering Column - Intermediate Lower (Remove and Replace)
Removal
Remove the underhood storage unit for access (refer to
procedure).
Mark the lower intermediate shaft position relative to the upper
intermediate shaft and pinion.
Remo
Shaft - Steering Column - Intermediate Lower (Dual Motor) (Remove and
Replace)
Warning: If the 12V power supply is disconnected, do
not attempt to open any doors with door glass in closed
position. Failure to follow this instruction could result in
door glass shat
SEE MORE:
Light - Fog/Reverse - Rear - LH (Remove and Replace)
Removal
Remove the liftgate applique (refer to procedure).
Remove the tailgate lower finisher (refer to procedure).
Release the watershield for access to the fog/reverse lamp.
Note: A new watershield might be required if the
adhesive is unable to secure it in posit
Battery Coolant Pump 1 (Remove and Replace)
Warning: If the 12V power supply is
disconnected, do not attempt to open any doors with door glass
in closed position. Failure to follow this instruction could
result in door glass shatter.
Note: Before disconnecting the 12V power supply,
ensure that the driver's door window i
© 2019-2026 Copyright www.tesms.org
