Tesla Model S: Wiper Arms - Pair (Remove and Replace)
Tesla Model S (2012-2026) Service Manual / Electrical / Wiper Arms - Pair (Remove and Replace)
Special tools recommended for this procedure:
| Supplier | Part Number | Description |
| Tesla | 10558696-00-A | Wiper Arm Removal Tool |
- Open the hood.
- Mark the installed position of the wiper arm on the windshield.
- Select service mode on the touch screen to move the wiper arms into the maintenance position.
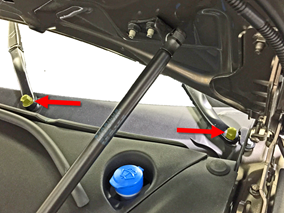
- Remove the nut that secures the wiper arm to the wiper spindle
(torque 31 Nm).
- Break the taper and remove the wiper arm. Tip: If necessary, use the wiper arm removal tool to assist with this step.
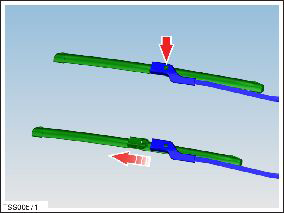
- Press the retaining clip and slide the blade from the wiper arm.
- Repeat this procedure to remove the other wiper arm.
Installation procedure is the reverse of removal.
READ NEXT:
 Wiper Blades - Adjust
If the wiper blades streak or chatter during cycling, perform the following:
Use the touchscreen to set the wipers to Service Mode.
Clean the wiper blades thoroughly with isopropyl alcohol wipes o
Filter - Particulate (Remove and Replace)
Removal
Remove the rear center underhood apron (refer to procedure).
Release the retainers (x2) that secure the particulate filter
cover.
Note: Components have been re
SEE MORE:
Headlining - Panoramic Roof (Remove and Replace)
Removal
Remove front windshield (refer to procedure)
Lower headlining for access (refer to procedure)
With assistance remove headlining through front windshield
opening.
Remove rear map lamps from headlining.
Bumper Assembly - Front (Remove and Replace)
Warning: If the 12V power supply is disconnected, do
not attempt to open any doors with door glass in closed position.
Failure to follow this instruction could result in door glass
shatter.
Note: Before disconnecting the 12V power supply,
ensure that the driver's door window
© 2019-2026 Copyright www.tesms.org
