Tesla Model S: Shift Using the Center Console
In addition to manually shifting on the touchscreen, you can shift by pressing P, R, N or D located on the center console. In most situations, these buttons are not available until you press one of the buttons to activate it. When active, the LEDs associated with each button illuminate and when you select P, R, N or D, the associated LED illuminates amber.
In situations where the touchscreen is unavailable (for example, experiencing a technical issue), or Model S is in Valet or Transport Mode, the drive mode selector on the center console activates automatically and there is no need to touch it.
NOTE: You can also activate the drive mode selector on the center console by simultaneously and briefly pressing both scroll buttons on the steering yoke. However, if you press and hold both buttons simultaneously, the drive mode selector activates and the touchscreen restarts.
NOTE: The front trunk, rear trunk, and doors must be closed to shift using the center console.
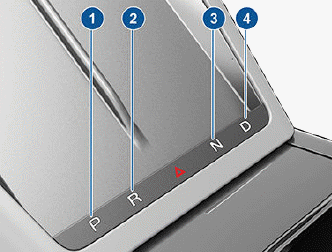
- Park
- Reverse
- Neutral
- Drive
NOTE: When the touchscreen is available for shifting and you have manually activated the drive mode selector on the center console, the center console automatically deactivates if you don't shift within 10 seconds.
READ NEXT:
 Park
Park
Model S automatically shifts into Park whenever it
determines that you are exiting the vehicle. For example,
the driver's seat belt is unbuckled and the vehicle is
stopped. Model S also automatical
Neutral
Neutral allows Model S to roll freely when you are not
pressing the brake pedal. To shift into Neutral, do any of
the following:
Open Controls, then press and hold the Neutral icon
on the drive
SEE MORE:
Knee Air Bag - Front Passenger's (Remove and Replace)
Warning: If the 12V power supply is disconnected, do
not attempt to open any doors with door glass in closed
position. Failure to follow this instruction could result in
door glass shatter.
Note: Before disconnecting the 12V power supply,
ensure that the driver's door window
Antenna Amplifier - AM/FM and RKE (Remove and Replace)
Removal
Remove the LH liftgate trim (refer to procedure).
Remove the screw that secures the amplifier to the liftgate.
Carefully disconnect the amplifier connector.
Release the clip that secures the amplifier to the liftgate.
Note: RH side shown.
