Tesla Model S: Air bag - Front Passenger's (Remove and Replace)
Tesla Model S (2012-2026) Service Manual / Safety and Restraint / Air bag - Front Passenger's (Remove and Replace)
Note: Removing the passenger's front airbag destroys the instrument panel top pad.
Removal
- Remove the top pad (refer to procedure) Note: The top pad is not reused in this procedure.
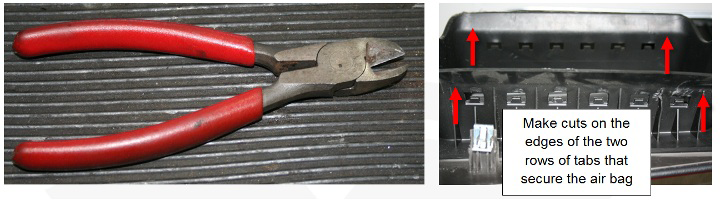
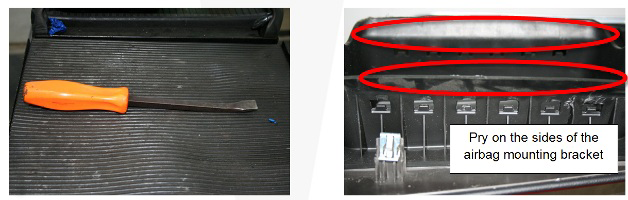
- Remove the passenger airbag from the instrument panel top pad:
Either use diagonal cutters to cut out the airbag, or use a pry
tool.
Warning: Store the air bag module with the deployment side facing up. This will prevent it from being propelled if accidentally deployed, which might cause injury.
- Installation procedure is the reverse of removal.
- Secure the passenger's front airbag to the new top pad
- Installing the new top pad requires two technicians: One technician presses down on the LH side of the top pad to secure the LH clips while the other technician presses down on the RH side to secure the RH clips. Working from the outer edges of the top pad inward, secure all the clips.
- After reconnecting each harness to the sides of the airbag,
press in on the latch so that it is flush with the face of the
connector. Gently try to pull the connector out again without
releasing the latch to ensure that the connection is tight.
.png)
.png)
- Follow the proper glove box reinstallation procedure (refer to procedure)
- After all procedures are complete, sit in the driver's seat and press the brake pedal to turn on drive rails. Ensure that the airbag safety indicator light exhibits normal operation: The light displays for 5 seconds during vehicle startup, then turns off.
READ NEXT:
 Knee Air Bag - Front Passenger's (Remove and Replace)
Warning: If the 12V power supply is disconnected, do
not attempt to open any doors with door glass in closed
position. Failure to follow this instruction could result in
door glass shat
Curtain Air bag - Driver's (Remove and Replace)
Warning: If the 12V power supply is disconnected, do
not attempt to open any doors with door glass in closed
position. Failure to follow this instruction could result in
door glass shat
Seat Belt Assembly - 1st Row - LH (Remove and Replace)
Warning: If the 12V power supply is disconnected, do
not attempt to open any doors with door glass in closed
position. Failure to follow this instruction could result in
door glass shat
SEE MORE:
Volume Controls
Roll the scroll button on the left side of the steering
yoke up or down to increase or decrease volume
respectively. The scroll button adjusts the volume for
media, voice commands, and phone calls.
NOTE: Your Model S automatically adjusts the volume
based on driving speed and climate settings.
Y
Underhood Storage Unit (Dual Motor) (Remove and Replace)
Removal
Remove the underhood aprons.
Peel back the carpeting at the rear of the underhood storage
unit. Release the bolts (x2) (torque 8 Nm).
Peel back the carpeting at the front of the underhood storage
unit.
© 2019-2026 Copyright www.tesms.org
