Tesla Model S: Bolster - Side - Seat - 2nd Row - LH (Remove and Replace)
Tesla Model S (2012-2026) Service Manual / Seats / Bolster - Side - Seat - 2nd Row - LH (Remove and Replace)
Removal
- Fully open the LH rear door.
- Release the LH rear seat back rest lock and push the rear seat back rest flat for access.
- Insert a wedge tool behind the bolster to provide outward
pressure.
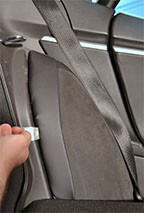
- Use a long screwdriver or long pliers to disengage the upper grommet.
- Release the seat side bolster from the grommet.
Caution: If the bolster cannot be removed easily,
do not force it. This might bend the bolster structure,
permanently damaging the bolster.
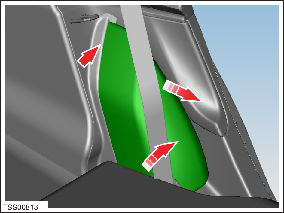
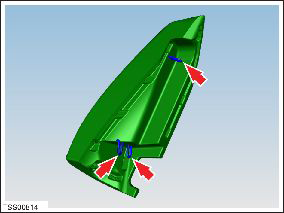
- Repeat steps 4-5 on the lower grommet.
- Remove the seat side bolster.
READ NEXT:
 Striker - Seat back - 2nd Row Seat - LH (Remove and Replace)
Removal
Remove rear trunk side trim (refer to procedure)
Remove rear sill trim panel (refer to procedure)
Remove screws (x2) securing striker to body (torque 17 Nm).
Pivot Lock - Seat back - 2nd Row Seat - LH (Remove and Replace)
Removal
Remove LH rear seat back rest assembly (refer to procedure)
Remove E-clip securing pivot lock.
Slide pivot
Pivot Lock - Seat back - 2nd Row Seat - RH (Remove and Replace)
Removal
Remove rear seat back rest assembly (refer to procedure)
Remove E-clip securing pivot lock.
Slide pivot lock fr
SEE MORE:
Back Plate - Door - Exterior Handle - Front - LH (Remove and Replace)
Removal
Remove door handle for access (refer to procedure)
Position handle assembly on a soft working surface.
Remove door handle rear seal.
Remove screws (x4) securing handle grip backplate and remove
(torque 2 Nm).
Master Cylinder (Remove and Replace)
Note: This procedure
applies to vehicles with the vacuum brake booster only. If the
vehicle has the electromechanical brake booster assembly, the
master cylinder is part of the brake booster assembly. Refer to
procedure 33031402
(refer to procedure).
Removal
© 2019-2026 Copyright www.tesms.org
