Tesla Model S: Striker - Seat back - 2nd Row Seat - LH (Remove and Replace)
Tesla Model S (2012-2026) Service Manual / Seats / Striker - Seat back - 2nd Row Seat - LH (Remove and Replace)
Removal
- Remove rear trunk side trim (refer to procedure)
- Remove rear sill trim panel (refer to procedure)
- Remove screws (x2) securing striker to body (torque 17 Nm).
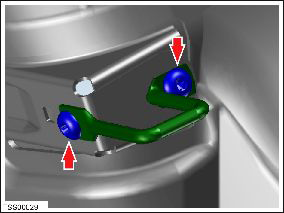
- Remove striker.
- Install the new striker and tighten the outboard screw. Only partially tighten the inboard screw.
- Compare the striker to the seat back and adjust striker height.
- Tighten both screws to full torque (torque 17 Nm). Confirm fit against seat back.
- Reinstall rear sill trim panel.
- Reinstall rear trunk side trim.
READ NEXT:
 Pivot Lock - Seat back - 2nd Row Seat - LH (Remove and Replace)
Removal
Remove LH rear seat back rest assembly (refer to procedure)
Remove E-clip securing pivot lock.
Slide pivot
Pivot Lock - Seat back - 2nd Row Seat - RH (Remove and Replace)
Removal
Remove rear seat back rest assembly (refer to procedure)
Remove E-clip securing pivot lock.
Slide pivot lock fr
Pivot Sleeve - Seat back - 2nd Row Seat - LH (Remove and Replace)
Removal
Remove Rear LH seat back rest assembly (refer to procedure)
Spread nose of pivot sleeve and remove from LH seat backrest.
SEE MORE:
HV Harness - HVJB to Charge Port - 2nd Generation
Warning: Only technicians who have been trained in High
Voltage Awareness are permitted to perform this procedure. Proper
personal protective equipment (PPE) and insulating HV gloves with a
minimum rating of class 00 (500V) must be worn any time a high
voltage cable is handled. Refer
Reservoir Assembly - Coolant (Remove and Replace)
Warning: If the 12V power supply is disconnected, do
not attempt to open any doors with door glass in closed position.
Failure to follow this instruction could result in door glass
shatter.
Note: Before disconnecting the 12V power supply,
ensure that the driver's door window
© 2019-2026 Copyright www.tesms.org
