
Tesla Model S: Bushing Removal, Rear Motor Mount
Warning: To avoid personal injury, eye protection must be worn when performing this operation.
Warning: To avoid personal injury, safety-toe shoes and cut-resistant gloves are recommended when performing this operation.
Note: A demonstration video for removing and replacing the drive unit bushing can be found on the Tesla Academy training site. It is listed as TAS-DU-BUSHING-OLT-01_EN: Model S Drive Unit Bushing Removal Video.
The drive unit bushing tool set includes the following parts:
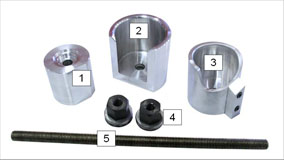
| 1 | Driver |
| 2 | Front bushing cup |
| 3 | Rear bushing cup |
| 4 | Nut bearing assemblies |
| 5 | Threaded rod |
- Remove the drive unit (refer to procedure).
- Use brake cleaner to clean the threaded rod and the nut bearing assemblies.
- Use 3M Spray Lube 08878 or equivalent to lubricate the threaded rod and the nut bearing assemblies.
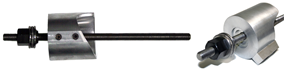
- Thread 1 nut bearing assembly onto 1 end of the threaded rod.
- Slide the closed end of the rear bushing cup onto the other end
of the threaded rod.
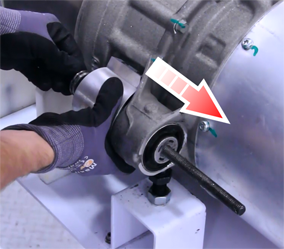
- Slide the other end of the threaded rod through the left side of
the rear bushing.
- Slide the driver onto the other end of the threaded rod so that
the side of the driver with the single tapered counterbore faces the
bushing.
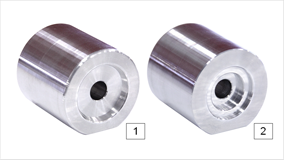
1 Faces bushing 2 Faces nut bearing assembly - Thread the second nut bearing assembly onto the other end of the threaded rod until it lightly touches the driver.
- Adjust the assembly until the rear bushing cup is seated flush against the front motor mount.
- Place a 1 in (24 mm) ratchet wrench onto each nut bearing assembly.
- Alternate rotating the ratchet wrenches to push the driver
towards the rear bushing cup until the bushing is removed into the
bushing cup.
Caution: If the effort required to rotate the ratchet wrenches is excessive, the tool is misaligned and continued ratcheting could cause damage. Loosen the nut bearing assemblies on the threaded rod, add lubrication to the threaded rod, realign the parts, and begin again.
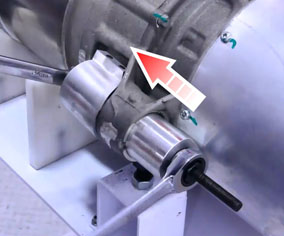
- Remove the tool and the bushing from the rear motor mount.
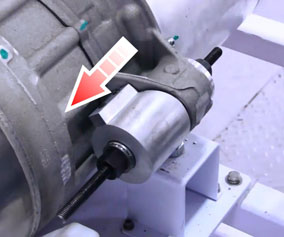
- Disassemble the removed tool. Discard the bushing.
READ NEXT:
 Bushing Installation, Rear Motor Mount
Use brake cleaner to clean the threaded rod and the nut bearing
assemblies.
Use 3M Spray Lube 08878 or equivalent to lubricate the threaded
rod and the nut bearing assemblies.
Slid
Sensor - Motor - Speed (Remove and Replace)
Removal
Remove the mid aero shield (refer to procedure).
Disconnect the speed sensor connector.
Remove the bolt that secures the speed sensor to the end bell
(torque 8 Nm).
Gearbox Fluid - Large Rear Drive Unit (Remove and Replace)
Warning: If the vehicle has air suspension,
activate "Jack" mode on the touchscreen before raising and
supporting the vehicle.
Drain & Refill
Raise and support the vehicle (refe
SEE MORE:
Powertrain Coolant Pump 1 (RWD) (Remove and Replace)
Coolant pump locations:
RWD Model S
Dual Motor Model S
1
Powertrain coolant pump 1
RWD vehicle
2
Battery coolant pump 2
RWD vehicle
3
Battery coolant pump 1
RWD vehicle
General Precautions
Dangerous substances
Modern vehicles contain many materials and liquids which, if not handled
with care, can be hazardous to both personal health and the environment.
Warning: Many liquids and substances used in motor vehicles
are poisonous and should under no circumstances be consumed; th
